- If it is a geodatabase the tool will be Validate Workspace
- If it is a replica geodatabase the tool will be Validate Replica Workspace
- If it is a feature class the tool will be Validate

- The first part of the validation is checking the setup against Lucity requirements it checks to make sure the Required and Optional linking fields are all filled out.
- The results display the Lucity Module name : Feature Class Name. Any messages for a feature class are displayed below.
- Suggestions are displayed in Light Gray, Warnings in Orange and Errors in Red.
- If an Error is detected the Validation will NOT continue on to check the geodatabase. The feature class with the error will NOT be able to sync with Lucity. The following message will be displayed

- The second part is checking the configuration between the geodatabase and Lucity it is checking to make sure the specified fields exist in the geodatabase and that the data types and field masks match.
- The results display the Lucity Module name : Feature Class Name.
- Warnings are displayed in Orange, and Errors in Red.
- If an error is detected the following message will be displayed

- The configuration can connect to the Feature Service that the feature is configured to work with.
- Checks to see if the feature class is in the service.
- Checks to make sure all the linked fields are in the service.
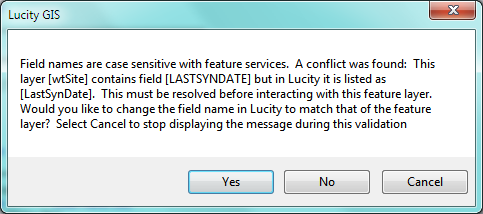
- If it can't find a field it checks to make sure that the field name entered in the geodatabase configuration has the same case as the actual field name. If it finds a field name that is the same but entered with a different case the following prompt will appear:

- Click Yes to update the geodatabase configuration with the case-matching field name. This will repeat for any fields that it finds problems with.

Note: The amount of time the Validation takes depends on whether it is being run against a feature class and the entire geodatabase. If it is run against the entire geodatabase it depends on how many features classes are linked to Lucity.
Note: Any Errors or Warnings found during a validation of a replica should be fixed in the DEFAULT geodatabase. These changes will automatically update the replica configuration.