Barcode Reports

Several Barcode reports have been provided by Lucity. These reports can be printed with unique barcodes allowing you to scan a barcode identifier rather than typing a Part or Warehouse ID. These reports are:

Additionally, you can also use barcodes on any other desired reports. Follow the steps below to insert a barcode into a report:

  1. In Crystal Reports, create a Formula Field with a barcode equation similar to the following, where the value inside the brackets represents the field you wish to barcode:

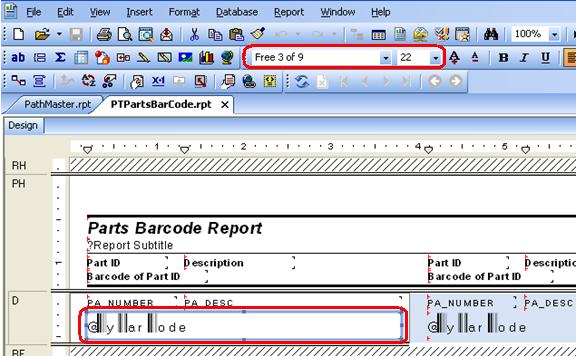
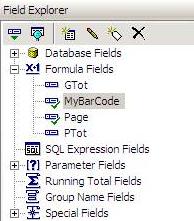
    "*"+{PTPARTS.PA_NUMBER}+"*"

    Formula Field

    Barcode Equation

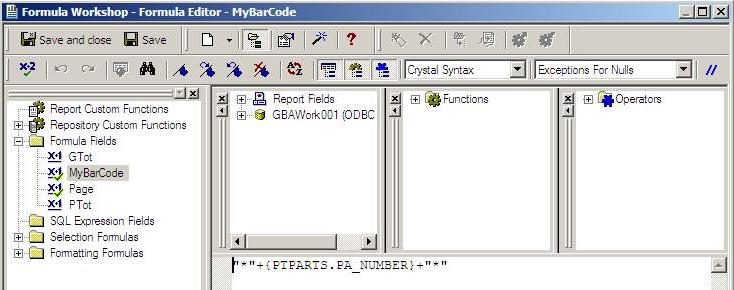
    Note: You can use this formula on any unique field you wish to barcode. For example, you may barcode Work Order Numbers, Employee Codes, Equipment Codes, Part IDs, etc.

  2. Change the font for that field to a Barcode font. The desktop application uses the font Free 3 of 9, which complies with the barcoding standard, Code 39 (also known as Code 3 of 9). This Barcode Driver is free for download online. Follow the link for additional details.

    Note: If you'd like to use a different barcoding standard (Code 128, Code 93, etc.), you will need to obtain a font that supports that standard. The font referenced above will only output Code 39.

    Barcode Report

  3. You may need to adjust the length of the field in the report to ensure that the entire code can be displayed.
  4. You may also need to adjust the font size so that it can be scanned by the barcode reader.
  5. The report will be printed with the unique barcode.

See Also

Inventory

Getting Started

Warehouses

Parts Inventory

Transactions

Purchase Orders

Vendors

PO Setup

Warehouse Operations Barcoding Device

Field Transaction Import