Lucity Web Setup

To begin using the Web User Interface after the installation, consult the Getting Started topic.

In order to set up Web, you'll need to complete the basic steps listed below in the User Interface. Click on the links for additional information.

  1. Create Dashboard Templates and custom Dashboard pages.
  2. Create Views that will include the data that you would like to display.
  3. Create Grids to display data on the web pages.
  4. Create Forms to add new records, edit existing records, and view details about various objects on the web. Forms are contained within the Grids.
  5. Assign groups to the Views, Forms, and Timesheets.
  6. Specify where the views, forms, and Timesheets appear on the menu.

    Note: For end-user instruction on the Dashboard, GIS Server Tasks, Web, and Web Citizen applications, consult the Web Help Guide.This section goes through how to setup Lucity web after it is installed.

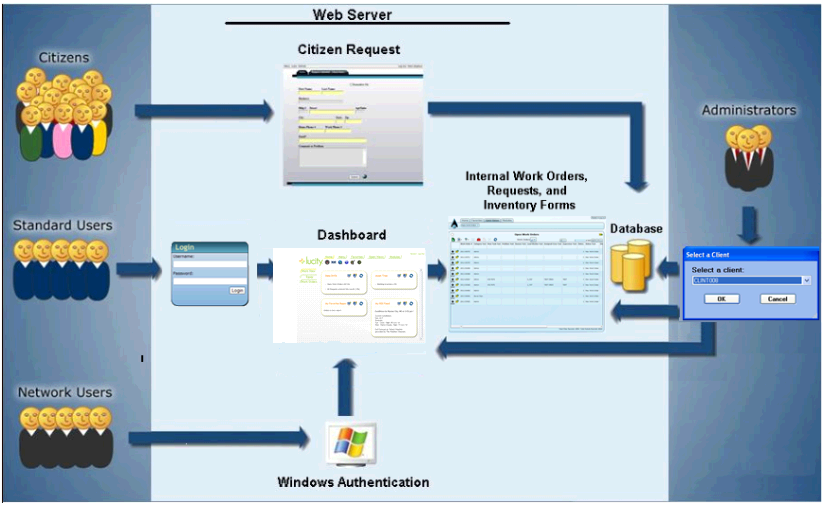
Below, we've included a diagram to show you how the Web system works. For additional information on the steps in this process, consult the topics within the User Interface help guide. There, we'll show you how to set up each of the steps needed for the Web system to function.

See Also

How To

WebMap/GIS Viewer/Mobile Map Setup

GIS Update using ArcGIS Server

Timesheet setup

Document Control Setup

Web Citizen Setup

Advanced