- Select the Open Module Tool
 .
. - Right click on the asset in the map you would like to work with.
- When you right click you will be given a menu with a list of assets at the approximate point you clicked on. The system uses a small search tolerance so that you do not have to click exactly on the feature; however, this means you may also see additional features that neighbor the feature you are interested in.
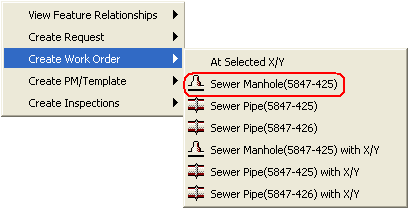
- Select Create Work Order from the tool menu. This will display an additional drop-down menu allowing you to select the exact feature for which the Work Order will be created.
Note: You have the option to either select the feature with or without an X/Y coordinate. Selecting a feature with the X/Y coordinate will create a Work Order with the feature and coordinates attached. This is particularly useful if you are designating particular repair locations on street segments, sewer lines, or other large features.
- In the illustration below, we have selected to work with a manhole located on a sewer line.

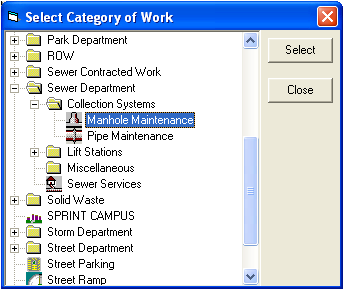
- Once you have select the feature (example circled in red above), you will see a dialog box prompting you to select a category for the work order. To expand the folders in the category tree, double click on the folder or click on the plus sign (+) to the left of the folder. You must select a category that corresponds to the asset type you selected. The dialog box will appear only if there is more than one category for the asset.
Note: If you have difficulty finding the proper category, try looking at the icon beside each feature. You should be able to find that same icon somewhere in the category tree.

- If you select a category that is not associated with that asset type, the following message will appear. You'll need to click Retry to return to the Category tree or click Cancel to return to the map.

- Once you have found the proper category, click Select. Lucity GIS will create the work order for you, and a will be opened with that work order in edit mode. With the Create Work Order option, the asset will be attached to the work order, but the X and Y coordinate at the point you clicked will not be stored with the work order.
Note: To store exact coordinates along with your work order (for example, a pothole repair), you need to select the Create Work Order with X/Y option. The process you follow will be identical, but an X and Y coordinate will be stored with the work order as well. If you perform a View Work Locations, the asset will be displayed and the X and Y coordinate will be drawn on top of the asset to identify the exact location of the work order.


