Once you create a project and add all the necessary layers for viewing, save the project to your workstation. You can copy this project to other workstations as long as each path for a project layer is accessible to those users.
 (located on the module toolbar). To do this, complete the following steps:
- Open Windows Explorer and navigate to the Lucity directory. This may be located at C:\Lucity or C:\Program Files\Lucity.
- Open the Lucity directory and find the EMSShowMap.exe.
- Double click the EMSShowMap.exe. to open the file (or right click on the file and select "Open"). The following EMS Show Map Configuration dialog will appear.
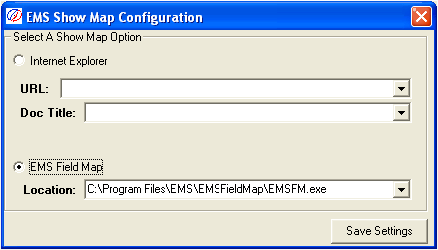
- You will be prompted to select a URL or an EMS Field Map project location. The URL is only used for Mapguide integrations and can be left vacant. Type in the path from the LucityView.exe, enter a single space, and then enter the path of the project. Click the "Save Settings" button to save your changes and close the window.
- Go to Systems > Configuration > GIS > Show in Map and change the "Component" from LucitySIM.exe to EMSShowMap.exe.
- Close and re-open the desktop application. The Show in Map button will then be enabled.