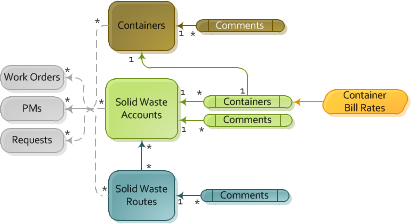
This page outlines the process for implementing Lucity's Refuse/Recycle modules. Agencies must first establish a record of its Solid Waste accounts. Then, if desired, information regarding related Containers, Billing Rates, and Routes can be integrated into these accounts.
1. Create Solid Waste records to identify locations that receive waste removal services.
In the Solid Waste grid, click the button. The Solid Waste form appears.
Enter the Location Number (required) to identify the record.
Enter the Property ID Tag if you would like to link the location to an address record in the Customer Address module.
Fill out the other fields as desired.
If you are not planning on using the Route or Containers modules you can use the related fields on the Solid Waste record to fill out related information.
If you are using the associated Containers module you do not need to fill out any of the fields about containers or schedules. This information will be entered elsewhere.
If you are using the associated Routes module you do not need to fill out any of the fields about routes. This information will be entered elsewhere.
Save and Close the record.
Note: You can import existing records from another source using the Import and Update tool.
2. Create Container records for the individual waste receptacles emptied at each location.*
In the Solid Waste Container grid, click the button. The Solid Waste Container form appears.
Enter the Container Number (required) to identify the record.
Fill out other fields as desired.
Save and Close the record.
*If an agency does not want to track individual containers, users can record basic container information (quantity, type) directly on the Solid Waste record.
Note: You can import existing records from another source using the Import and Update tool.
3. Establish the Pickup Rates used to bill for different types of containers.
Select the solid waste account you want to add a container to.
Click the button to expand the record.
Select the Solid Waste Linked Containers grid, click the button. The Solid Waste Linked Containers form appears.
Choose a Container Number from the pick-list (required). This list contains records from the Solid Waste Containers module. Only those containers not currently associated with a Solid Waste account location appear in the list.
In the Effective Date field, select the date the container will be delivered to the account (required).
Enter the Provided Date, Expiration Date, and Removed Date as needed. The system automatically populates the Purpose field.
Select a billing Rate. These come from the Container Pickup Rate module. This selection automatically populates the Billing Amount.
Complete other fields as desired.
Click the button to save the record.
The Container now appears in the Solid Waste record's Solid Waste Linked Containers grid, and
The account's address appears in the Container record's Solid Waste grid.
The Location Status of the related Container record in the Refuse Containers module is updated to 1 | Installed.
Select the solid waste route you want to add an account to.
Click the button to expand the record.
Select the Solid Waste grid.
In the Solid Waste grid, click the button.
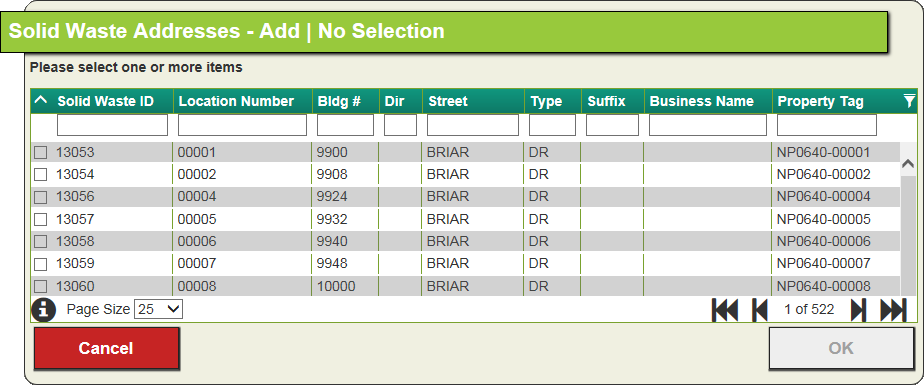
Select Solid Waste Addresses - Add. The following pop-up appears:
Select one or more addresses in the grid.
Click OK. The account location is added to the Route's Solid Waste grid.
Repeat these steps for all Solid Waste accounts, Pickup Rates, and Routes. The rest of this guide provides more detailed information about module design, fields with special functions, and expanded usage.
 Add a Solid Waste record.
 button. The Solid Waste form appears.
 button to expand the record.
 button to save the record.
  button. The following pop-up will appear:
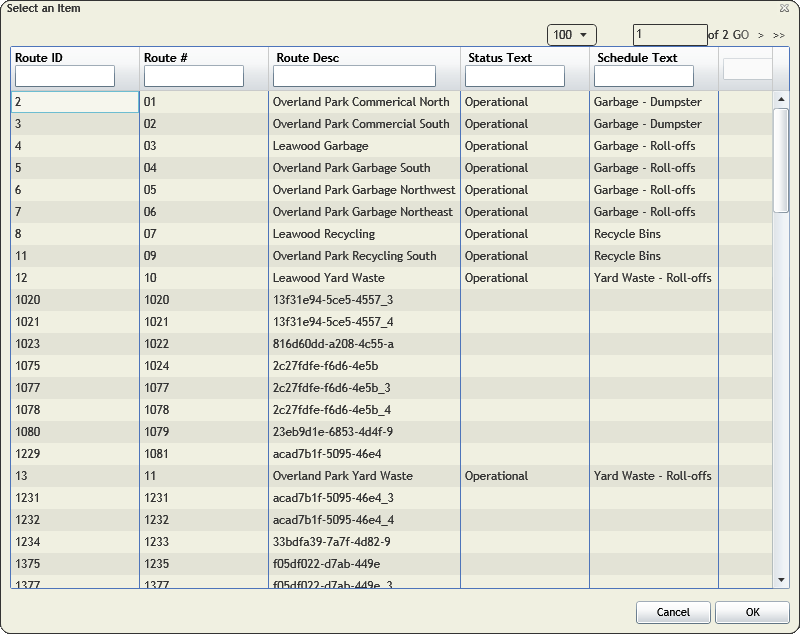
 button.