Select the vehicle you want to add an inspection to.
Click the button to expand the record.
Select the vehicle's Inspection grid and click the button. A new inspection record is started with the Fleet ID field filled out using the ID for the associated vehicle.
Continue to Fill out the Record....
Method 2
Open the Fleet Inspection module.
Click the button. A new record will appear.
Enter or select the Fleet ID for the vehicle the inspection is for (required).
Continue to Fill out the Record....
Filling out the Record
Enter the Inspection Date (required).
The combination of Fleet ID and Inspection Date must form a unique combination.
Complete other fields as desired.
Use the Maintenance Requested or Needs Repair fields to automatically create a request or work order for the vehicle.
Select the vehicle you want to add an inspection to.
Click the button to expand the record.
Select the vehicle's Travel Log grid and click the button. A new log record is started with the Fleet ID field filled out using the ID for the associated vehicle.
Continue to Fill out the Record....
Method 2
Open the Fleet Travel Log module.
Click the button. A new record will appear.
Enter or select the Fleet ID for the vehicle the inspection is for (required).
Select the vehicle you want to add a fueling record to.
Click the button to expand the record.
Select the Fueling grid and click the button. A new fueling record is started with the Fleet ID field filled out using the ID for the associated record.
Continue to Filling out the Record...
Method 2
Open the Fleet > Fueling module.
Click the button. A new record will appear.
Enter or select the Fleet ID for the record the fueling is for (required).
Continue to Filling out the Record...
Filling out the Record
Enter the Date and Time (required).
The combination of Fleet ID, Date, and Time must form a unique combination.
Use Fuel Amount to enter how much fuel was added.
Enter the unit cost of the fuel in the Cost Per Unit field.
Enter the Odometer to update the vehicles odometer reading.
Select the Vehicle Class (required). This will narrow your options for selecting a Fleet Rec #.
Enter or select the Fleet Rec # for which you want to create this Reservation.
Continue to Filling out the Record...
Method 2
Open the Fleet Inventory module.
Select the button to expand the Fleet vehicle for which you want to create a Reservation.
Select the Reservations grid and click Add . A new Reservation record is created with the Fleet Rec # and its associated Vehicle Class filled out.
Continue to Filling out the Record...
Filling out the Record
The Status will auto-populate to Requested but can be changed*.
*Note: Administrators can configure the Status picklist as restricted, in which case unauthorized users will not be able to change the record's Status.
Select the Approved By employee.
Note: This selection is only editable by and contains records for employees whose Employee Setup record is marked as Assigner.
Enter the Employee the reservation is for.
Enter Est. Departure Date and Time, and Est. Return Date and Time. These are required fields.
The Hourly Rental Rate and Daily Rental Rate will auto-populate from the Fleet record, if available, but can be changed on this reservation.
IMPORTANT: While these fields are not required, you must complete these fields in order to calculate a Total Rental Cost that includes costs associated with hourly and daily vehicle usage (Actual Dates/Times), respectively. Note that every 24 hours of Total Rental Time (hrs) populates 1 Total Full Rental Day, with remaining hours going toward Rental Additional Hours. More information about Reservation Date/Time calculations.
Enter a Reservation Charge, if applicable. This value represents a one-time fee other than the Hourly/Daily Rental Rates associated with the reservation.
Enter the Departure Mileage, if available.
Complete other fields as desired.
Select Save . The record appears in the Fleet Reservation module and the related Fleet Inventory record's Fleet Reservation grid.
Module Specific Tools
The Fleet module contains specialty tools for managing tires.
The Tire Inventory module stores information about tires used on an agency's fleet. The module is primarily used to track large, industrial tires that need to be recapped or retreaded to prolong their use.
Common Tasks
To open this module, select Fleet > Tires > Tire Inventory.
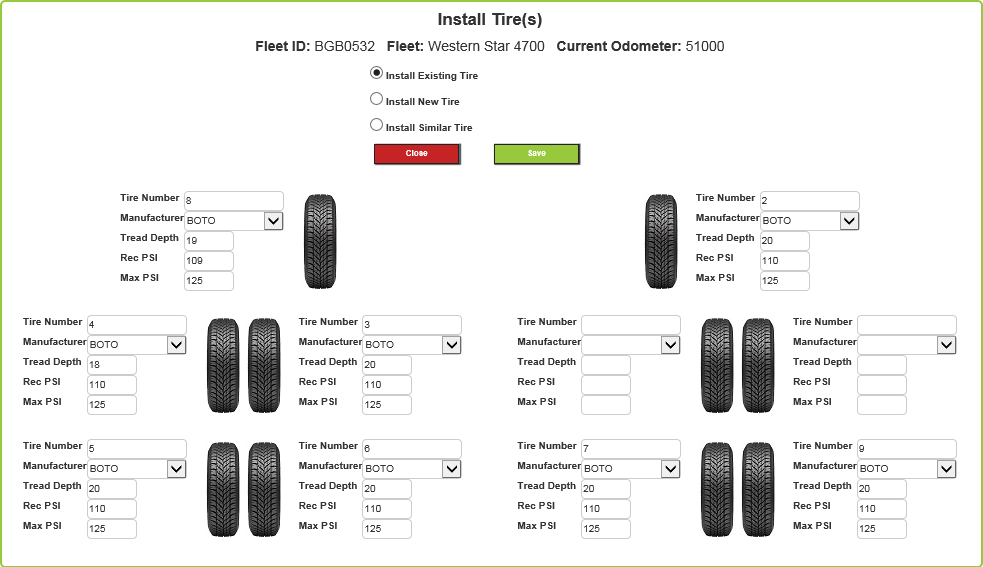
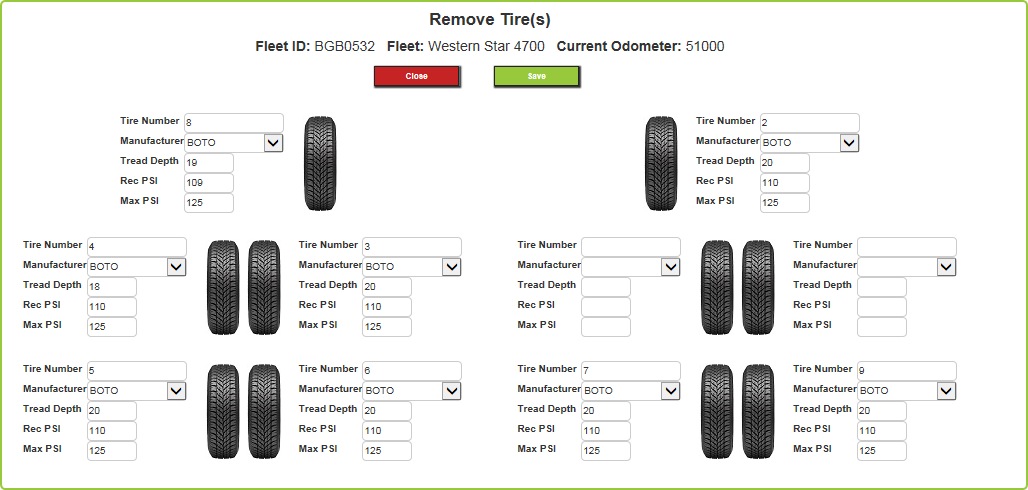
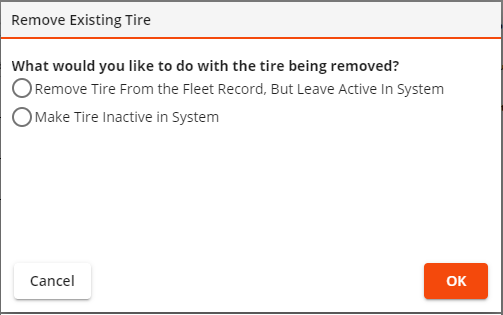
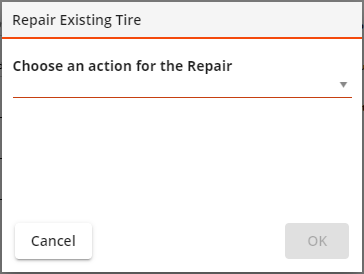
Click the Tire button and select Install Tire(s). The Install Tires tool appears:
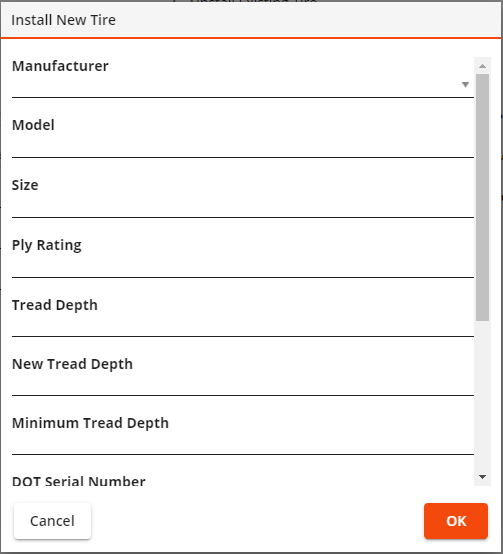
Select the Install New Tire option at the top of the screen.
Click on the tire graphic in the location in which you want to install the tire. The Install New Tire form appears:
Enter information about the new tire in the available fields.
Click OK on the form.
Click Save on the Install Tire Tool. The system adds a new record to the Tire Inventory and links it to the selected Fleet asset.
Click Close.
Locate and edit the record in the Tire Inventory module to Fill out the Record....
Method 2
Open the Fleet Inventory module.
Select a vehicle in the Fleet grid.
Click the Tire button and select Install Tire(s). The Install Tires tool appears:
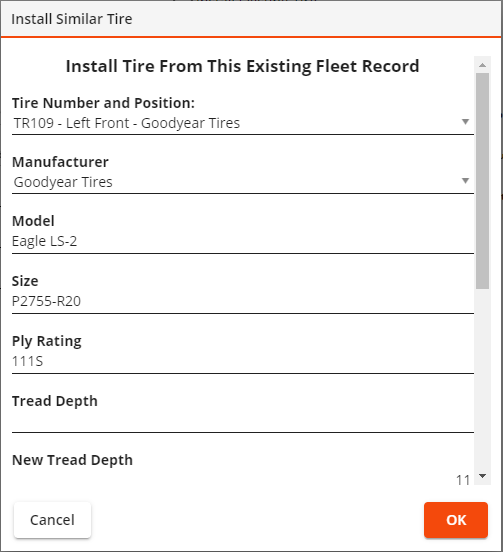
Select the Install Similar Tire option at the top of the tool.
Click on the tire graphic for the location at which you want to install the tire. The Install Similar Tire form appears.
Use the Tire Number and Position drop-down to select a Tire on the vehicle that is similar to the tire you wish to install now. The system copies data from the selected Tire record the new Tire record similar to the following:
Edit the attribute information as desired.
Click OK on the form.
Click Save on the Install Tire tool. The system adds a new record to the Tire Inventory and links it to the selected Fleet asset.
Click Close.
Locate and edit the record in the Tire Inventory module to Fill out the Record....
Method 3
Open the Tire Inventory module.
Click the button. A new record will appear.
Enter or select the Tire Number (required).
Continue to Fill out the Record....
Filling out the Record
Enter the Purchase Date, Purchase Date, Warranty Mileage, Warranty Life, and Warranty End Date to track warranty information for the tire.
Click the Tire button and select Install Tire(s). The Install Tires tool appears:
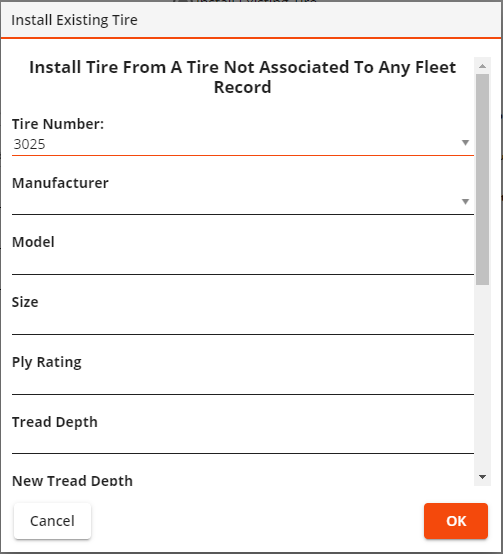
Select the Install Existing Tire option at the top of the screen.
Click on the tire graphic in the location in which you want to install the tire.
Use the Tire Number drop-down to select a tire. The system uses data from the Tire record to populate the related attribute fields. The following pop-up appears:
 How to add a Fleet vehicle
 button. A new record will open.
 button to save the record. The new record appears in the grid.
 button to expand the record.
 button and select Install Tire(s). The Install Tires tool appears: