The Work Order modules allow you to generate work orders containing specific data regarding the problem, the affected assets, the needed resources, and the involved tasks.
Note: All three Work Order modules (Standard, Lite, and Daily) use the same database; therefore, you can view or edit any work order from either of the three modules.
To create a work order, complete the following steps:
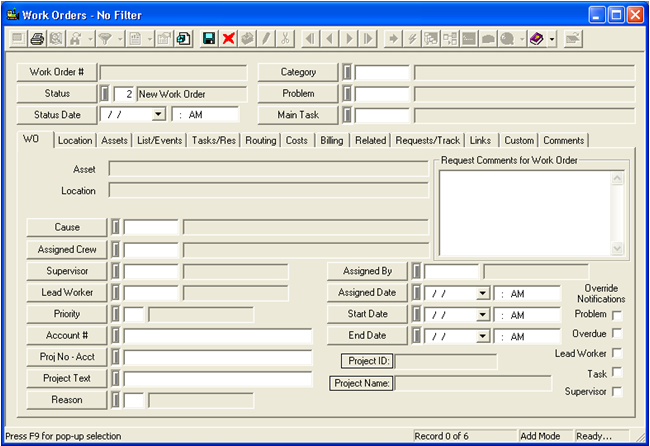
Open the Work Order module by selecting Work > Work Orders>Standard. The following window will appear:
Click on the module toolbar to enter Add Mode.
Note: Upon entering Add Mode, the Status field will be automatically populated along with the date and time. The Work Order # field will not be populated until after the record is saved.
Enter a category. This is the only required field for work orders.
Note: The category you select will determine which list of problems, causes, crews, and tasks are available in the rest of the work order.
Select a problem, and main task.
Under the WO tab, enter the cause, assign a crew, etc. The Asset and Location fields are read-only fields that are auto-populated. These fields allow you to see at a glance the first asset and location listed in the corresponding grids.
Note: A lead worker must be assigned to a work order if you want the Assigned Work field in the Work Flow SetupEmployees module to calculate the number of assigned work hours for that employee.
The Request Comments grid is automatically populated from the comments in the Requests module; however, you can add or edit the comments in the grid from this module.
Under the Location tab, enter a department, division, etc.
In the Work Order Locations grid, enter the address of each location where work will take place. (Right-click in the grid and select Add Record). The first address you enter in this grid will be auto-populated in the read-only Address field under the WO tab.
Under the Assets tab, enter any inventory assets associated with the work order (Right-click in the grid and select Add Record). The first asset you enter in the grid will appear in the read-only Asset field under the WO tab.
Under the Checklist/Events tab, enter any checklist items or events (Right-click in the grids and select Add Record).
Under the Tasks/Resources tab, enter additional tasks in the Tasks grid (Right-click in the grid and select Add Record).
Note: Any resources associated with a task (in the Work Flow Setup Tasks module) will be automatically populated in the Resources grid.
Enter any resources used to complete the task in the Resources grid and enter any estimated costs in the fields to the right of the grids.
Under the Routing tab, you can track tasks and sub-tasks and mark them as complete.
Under the Costs tab, enter any cost information in the corresponding fields.
Under the Billing tab, enter any billing or invoice information.
 on the module toolbar to enter Add Mode.
 to save the work order.