Perform Quality Control Checks on a Feature Class

To perform the QC checks on a feature class, complete the following steps:

  1. In ArcCatalog select the feature class you would like to check and click the qaqc command on the Lucity GIS toolbar.
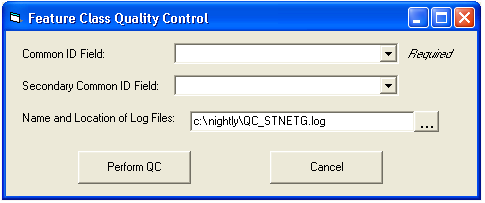
  2. After clicking the Lucity GIS Quality Control command the following dialog box will appear.

    QAQC

  3. To perform the QC checks on the feature class you need to specify which field(s) in the feature class contains the common ID. 

    Note:  Every feature class should contain a field or a combination of two fields that contain a unique value for each feature.  For example, a sewer structure feature class could have a common ID field of the structure number.  A sewer line feature class could have a common ID field of an upstream structure, and then a second common ID field of a downstream structure.

  4. *The results of the QC checks will be listed in three log files.  To distinguish between the three log files a suffix of “_1”, “_2”, and “_3” will be appended to the user’s log file name.  For example, if the user’s log file name was SewerLineQC then the three log files will be named SewerLineQC_1, SewerLineQC_2, and  SewerLineQC_3.
  5. Click PerformQC when you have finished filling out the form and are ready to perform the quality control checks. The following message will appear if the log file name you had chosen already exists.  In the example shown the user had chosen QC_STNETG for a log file name, but a QC_STNETG_1, QC_STNETG_2, or QC_STNETG_3 log file already exists in that directory.

    Overwrite Log File

  6. Click OK to delete the existing log files and create new, or click Cancel to change the log file name.   
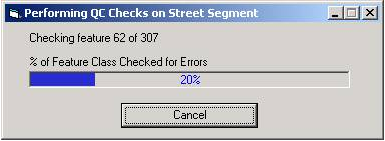
  7. When the QC checks are being performed the following form will be shown to indicate the status of the QC checks.

    Progress

  8. Click Cancel if you wish to stop the QC checks.  The following message will be displayed asking if you are sure you want to end the QC checks.

    QC Prompt

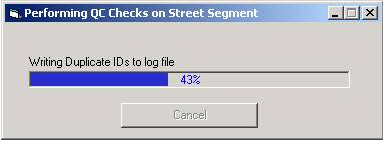
  9. After all features have been checked for errors, the results will be written to the three log files.  The amount of time this process requires to complete depends on how many errors were found in the feature class.

    Second Progress Bar

    Note:  You will be unable to cancel the process of writing to the log files.

  10. The following message will appear when the quality control checks have been completed and the log files have been created. 

    Log File Created

  11. By clicking Yes, the three log files will be opened in Notepad for you to view.

See Also

Database Administration QA/QC Checks

Viewing the QC Log Files