The Work Flow Steps grid is where you define default routing tasks. Each step can then have multiple sub-tasks assigned to it in the Work Flow Steps Sub-Task Grid. Then when a task is selected as a main task in a work order, all routing task information will be auto-populated into the Routing tab of the work order. From there, you can mark each routing task as complete.
To add a routing task, complete the following steps:
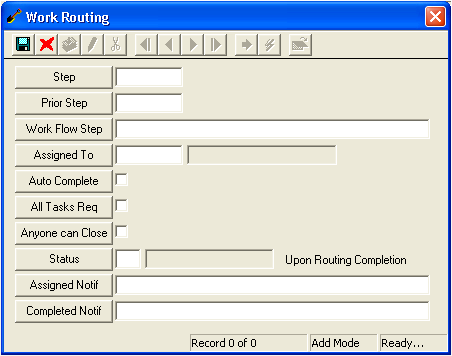
Right click in the grid and select Add Record. The following window will appear:
Enter the step number (e.g. 1, 2, 3) in the Step field.
Enter the number of the previous step in the Prior Step field (i.e. the step that must be completed before the current one).
Note: When entering the first step, enter a zero in this field.
Enter the task in the Work Flow Step field.
Assign an employee to the task. Only the assigned employee has permission to close a routing task (unless you have the "Anyone Can Close" box marked). If you leave this field empty, any employee can close the task.
Note: The system uses the employee login ID to determine if a user has permission to close a routing task; therefore, it is important that each employee have a login ID listed in his/her Work Flow SetupEmployee record. If not, that employee will not be able to edit or close routing task records.
Mark the "Auto Complete" box if you want the routing task to be closed automatically once all the sub-tasks are closed.
Mark the "All Tasks Req" box if you want each sub-task to be a required task. If this is box is marked, you will have to mark each sub-task as complete before closing the routing task.
Note: You can override this function for specific sub-tasks by editing the sub-task record.
Mark the "Anyone Can Close" box if you want all employees to be able to close the routing task.
Select the status of the work order upon routing completion (i.e. when all routing tasks are completed, what status do you want auto-populated in the work order? Closed, on-hold, on-going, etc.). This is not required.
Select which notification will be sent to the "Assigned To" employee when the Routing Task is activated in the Work Order module, Routing Tab.
Select which notification will be sent to the "Assigned To" employee once the task is marked as complete on the Work Order module, Routing Tab.
Note: Notifications are created in the Work Flow Setup Notifications module. Notifications will be sent to the Assigned To employee (if one is selected) as well as any addresses included in the Notification's Recipient List.
 to save the record.
 to close the window.