The Sewer Merge tool enables users to combine two Sewer Pipes and, if desired, delete the associated Sewer Structure.
To combine the pipes in both the map and in the Lucity database, users must use Lucity's Sewer Merge tool to combine the features, not the ESRI merge tool. The Lucity tool is enabled only when: 1) there are two features selected in the map; 2) the selected features are linear; and 3) the features are snapped together at one end.
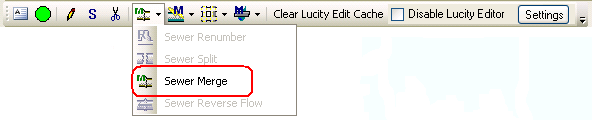
How To Merge Two Features in the Map
Start an edit session in ArcMap.
Select two adjacent Sewer features in the map by either 1) dragging a box around the two pipes or 2) clicking on one pipe and then holding down the SHIFT key while clicking on the second pipe.
Click the Sewer Merge tool on the Lucity GIS Edit toolbar.
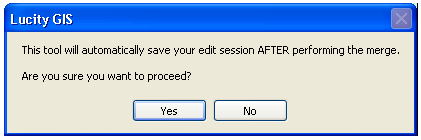
The Merge tool requires the system to save edits before and after performing the merge. When prompted to confirm the save (examples below), click Yes.
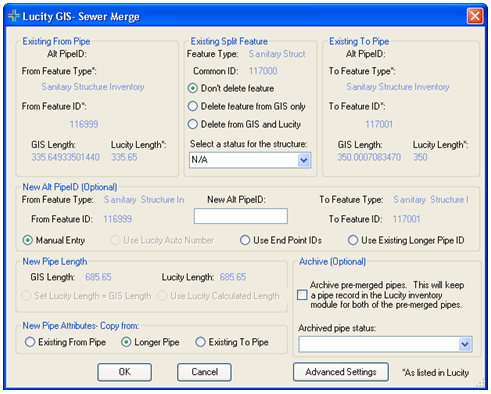
The Sewer Merge form appears. The three sections at the top of the form display information about the two Pipes being merged and, if applicable, the related Sewer Structure.
In the top-center box (Existing Split Feature), choose how you want the system to handle the feature following the merge:
Don't Delete Feature: Retains the structure in both the Desktop Inventory module and in the structure feature class.
Delete Feature From GIS Only: Retains the Structure in the Desktop Inventory module, but removes it from the structure feature class. Note: This option is disabled if the tool cannot locate a Structure within one map unit of the common End Point for the two Pipes or if the structure feature class is not editable.
Delete from GIS and Lucity: Removes the Structure from both the Desktop Inventory module and the structure feature class. Note: This option is disabled if the tool cannot locate a Structure within one map unit of the common End Point for the two Pipes, the structure feature class is not editable, or the Structure doesn't exist in the Desktop Inventory module.
Structure Status: If the Structure is to be retained in the Desktop Inventory, select a Status. This sets the status field for the asset record.
In the New Alt Pipe ID (Optional) section, choose whether to:
Manually enter a New Alt Pipe ID,
Use the Lucity Auto Number function (enabled only when an Alt Pipe ID field in the feature class uses a number-generator),
Use the End Point IDs, or
or Use the Existing Longer Pipe ID.
Note: The New Alt Pipe ID cannot be the same as one of the existing Alt Pipe IDs.
In the New Pipe Length section, choose how the system should treat any difference in the Pipe Length between Lucity and GIS (enabled only when such a difference exists):
Set Lucity Length = GIS Length or
Use Lucity-Calculated Length
In the New Pipe Attributes section, indicate whether the system should copy the new Pipe’s attributes from:
the Existing From Pipe,
the Longer Pipe, or
the Existing To Pipe.
To retain the pre-merge records for both Pipes in Lucity Desktop’s Pipe Inventory (optional), enable the Archive Pre-merged Pipes option and set a Status for the pre-merge (To and From) Pipes.
Archived Pipes cannot be shown in the map.
Users cannot create Requests, Work Orders or PM/Work Templates for the archived Pipes.
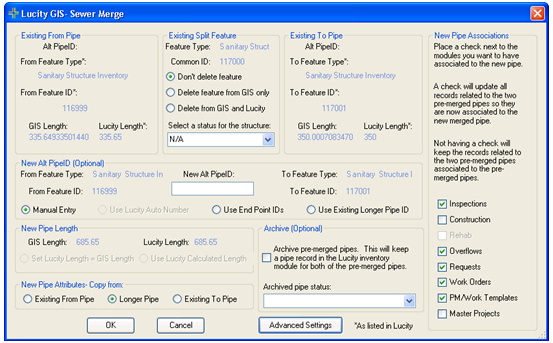
To override the settings that control which Lucity modules are associated with the new Pipe, click the Advanced Settings button.
Modules associated by default when deleting (not archiving) Pipes:
Inspections
Overflows
Requests
Work Orders
PM/Work Templates
Modules associated by default when archiving Pipes:
PM/Work Templates
Click OK. The following message appears when the merge is complete: