The Lucity Work Orders module integrates with the Eden Accounts Receivable module, allowing Work Order billing information to be exported to Eden to create Accounts Receivable invoices.
Components
Eden Customer Lookup - Enables Lucity users to look up existing Eden customers or to create new ones when completing a Work Order.
Eden Invoice Creation - Creates Accounts Receivable invoices based on information entered on the Billing tab in a Lucity Work Order.
Process
There are two steps necessary to integrate the Eden Accounts Receivable and Lucity Work Orders modules:
Eden Customer Lookup
Lucity Work Order Interface
This Eden Customer Lookup process must precede the Eden Invoice Creation process.
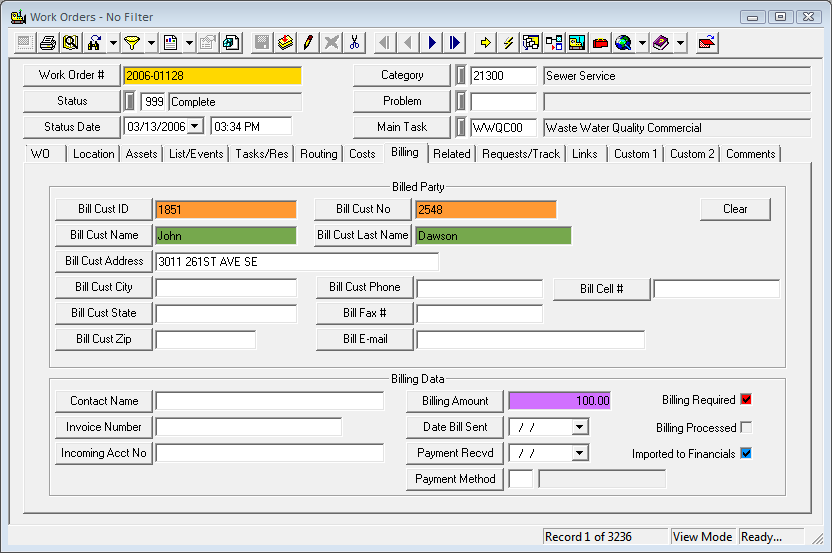
On the Work Orders > Billing tab, enter the Billed Party information. This information identifies the customer that should receive the bill or Accounts Receivable invoice.
Select either: 1) an existing Eden Customer using the pick lists in the Customer ID or Customer Number fields, or 2) enter a new customer.
When selecting an existing customer, users cannot edit the Billed Party information. This information must be edited within Eden.
To create a new customer leave the Customer ID and Customer Number fields (marked in orange) blank. The user can then enter customer information manually, which will create a new record in Eden.
Eden Invoice Creation
Lucity Work Order Interface
After completing the Billed Party information on the Billing tab:
Check the Billing Required flag to indicate that the Work Order is billable.
Enter a value in the Billing Amount field to specify the charges that should be billed to the Billed Party.
Close the work order by making the Status > 950.
Eden Interface
In Eden, go to Accounts Receivable > Billing > Invoices.
Select the Lucity Import icon.
Enter the Document Date, Description of the batch import, Customer Type, and the Invoice Modifier (optional) to be used when the import creates invoices.
Eden generates an exception report listing any records that could not be imported or that were imported with problems.
After the import, the Imported to Financials flag is auto-checked on the Lucity Work Order > Billing tab.
After the invoice is created within Eden's Account Receivable module, the Billing Processed flag is is checked on the Lucity Work Order > Billing tab.
 Fields imported during the process