Map setup

Map Mode allows all Lucity Mobile users to see all maps setup in the Lucity Administration tool. However, they will only be able to view maps that have services published over the DMZ. Use the following guide to setup a map that is best suited for the mobile application.

How To

Add or Edit a map

  1. In the Lucity Administration Tool select GIS > Map Setup from the main menu. The following dialog will appear:

    GIS Maps

  2. The left-hand side of the dialog displays all available maps. Click the Add Map Setup or Edit Map Setup buttons to open the GIS Map Edit screen


Selecting Map Services

  1. Make sure the Map has a unique name in the Name field.
    • Since the Mobile app will show all available map services it is advisable to make name the map services designed for the app distinct. (Ex. Mobile Water Map)
  2. Do not mark the Enable Local Services box. This is used for the Lucity GIS Viewer maps. Maps with his box marked are not available to Mobile users.
  3. Check the Use as Default Map box to make this the default map. The default map is automatically used every time map mode is opened.
    • There can only be one default map
    • Since the Mobile app will always use the default map first it is advisable to make the map intended for mobile users the default map.
  4. Set the Geocoding Url. - Enter a Url here if the geocoding service used for this map will be different that the url in the Default Geocoding Url box. The Default Url is set in Lucity Administration under System > Settings on the GIS tab.
  5. In the Available Web Services grid, select all the web services that need to be added to the map and click Add. Records will appear in the Services to Display in Map grid.
    • Add all desired map services, including base maps
  6. Note: the Available Local Services grid is only used for a Lucity Viewer map.
  7. In the Services to Display in Map grid check the Disable Identify box to stop the identify tool from querying that service. Disabling Identify also disables the ability to select features in that service. Note: Users can also manually control selectability in the map.
    • The order cannot be customized in this dialog; instead, set the order in the Order field under GIS > Map Services.
  8. Click Close to return to the Map Setup screen.

    Note: Lucity Data in all layers will be recognized by the Web Map and viewer tools, as long as the aliases are setup correctly. This will be different for clients using Lucity 7.3. There will be a Data Service for Feature Selection field where a single data service is specified. The map service in this box is the only one the Lucity Layers will be recognized in.

Android map setup


Save the Map

  1. Once the maps have been defined, click Save on the Map Setup screen.
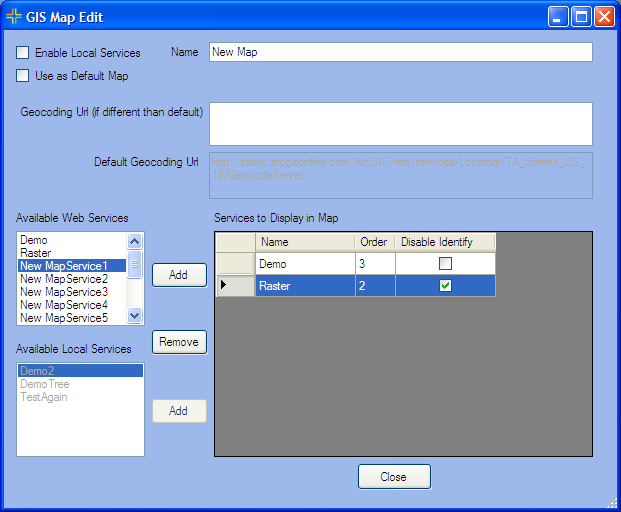
  2. The Lucity Mobile App will allows access to all maps (except for Lucity GIS Viewer maps), no matter which group the users are in, but will always initially load the default map. The mobile map setup is complete. If this map is to be used for the Lucity webmap too continue through the following steps to assign the map to a group.
  3. To assign maps to user groups
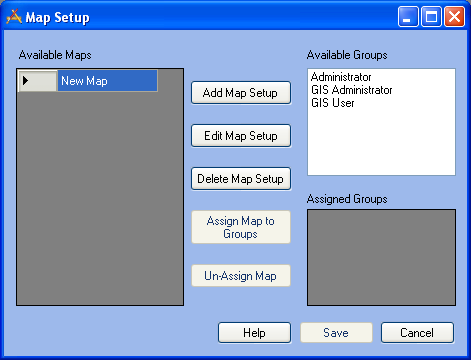
    1. Select a map in the Available Maps list on the left-hand side of the dialog.
    2. Highlight one or more groups in the Available Groups list on the right-hand side of the dialog.

      Note: The only groups that will appear in the Available Groups list are those that have been assigned as a default group in the Lucity Security Program.

    3. Click the Assign Maps to Groups button in the center of the dialog
    4. The groups currently assigned to each map will be displayed in the Assigned Groups list in the lower-right corner of the dialog.

      Note: While each map can be assigned to multiple user groups, each group can only be assigned to one map. So, if the Administrator group is assigned to the Water Map, and later assigned to the Traffic Map, the Administrator group will have access to the Traffic Map only.

  4. To un-assign a map from a group
    1. Highlight a map in the Available Maps list.
    2. Highlight a group in the Assigned Groups list.
    3. Click the Un-Assign Map button.
    4. Click Save to save any changes made.

GIS Maps

See Also

Lucity Mobile Map Setup

Alias Configuration

Service Configuration