button in the Widget Toolbar. If only one Timesheet exists for the user, it launches automatically. If the user has more than one Timesheet, he or she can select the desired timesheet from a drop-down list.
The Timesheet shows work hours for every day of the set pay period. It shows all tasks the employee worked on, as well as the number of hours spent on each task each day. These tasks either can be entered manually or imported from Work Orders.
More information about configuring the timesheet
Launching a Timesheet
To launch a Timesheet, click the button in the Widget Toolbar. If only one Timesheet exists for the user, it launches automatically. If the user has more than one Timesheet, he or she can select the desired timesheet from a drop-down list.
General Timesheet Tools
The following tools appear at the top of the Timesheet.
Submit |
Advises the Timesheet administrator that the user considers the Timesheet complete. |
|
Enter Design Mode |
Enables an administrator to modify the design of the current Timesheet.
|
|
Manage User Groups |
Enables an administrator to control which user groups have access to a particular Timesheet.
|
|
Pay Period |
Identifies the set of days for which employee time is totaled and paid. |
|
Date Selector |
Allows users to navigate between pay periods.
|
|
|
Refresh |
Refreshes the data in the Timesheet. This function enables users to see hours added when a Work Order is updated. |
|
Report |
Runs the Timesheet Report, which:
|
|
Sorting |
Click a column header to sort data by that column. |
 How to copy previous Tasks to the current pay period
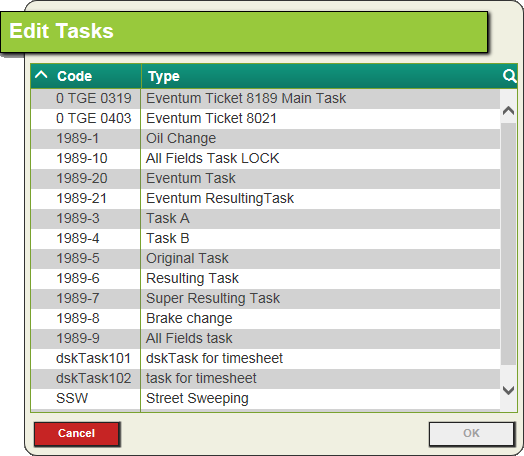
How to select a value from a pick-list
How to submit a timesheet for approval
Grids
Timesheet data is displayed in three related grids, Summary, Additional Time and Work Orders.
Note: If a Timesheet has been approved locked by a supervisor, a message appears in the top-left corner saying, "This period has been locked and cannot be edited." In such cases all grid tools are grayed out.
The Summary grid recaps the hours in the Additional Time and Work Orders Grids. The Summary grid, which is read-only, appears at the top of the Timesheet.
Hide Summary Show Summary |
Collapses/expands the Summary grid. |
Enables users to add, edit, or delete hours worked outside of those logged through Work Orders. To streamline data entry, users can also copy tasks from the previous pay period in this grid. Click on a record in the grid to edit it or use one of these tools.
|
Add New Task |
Adds a new Task line. |
|
Copy Records |
Copies all Task records from the previous pay period. |
|
Save Edits |
Saves all edits and exits edit mode. |
|
Cancel Edit |
Cancels any edits made and exits edit mode. |
|
Delete Task |
Deletes the selected Task. |
Hide Additional Show Additional |
Collapses/expands the Additional Time grid. |
|
Note: Once a Timesheet is submitted and has been approved or locked the time in that pay period will no longer be editable. Depending on setup the related work order employee resource records may no longer be editable either.
The Work Orders Grid displays any hours the employee logged through linked work order records. This grid is read-only; therefore, any changes to these hours must be made directly through the work order record.
|
Open in |
Opens the selected work order record in a Lucity Web view. |
Hide Work Show Work |
Collapses/expands the Work Orders grid. |
|


 in the Additional Time grid. A new blank line is added to the Timesheet's Additonal Time grid.
 to save the changes made to the Additional Time grid. Saving changes forces the system to recalculate the Task totals, as well as the Daily Totals in the Summary grid.
 to cancel all unsaved edits.
 . The following message appears:
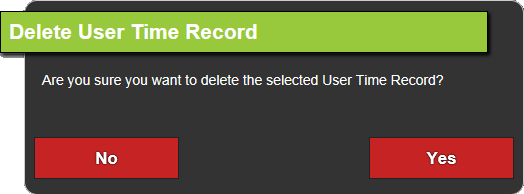
 button in the Additional TIme grid.