Customizing Toolbars

Lucity Desktop allows users to customize the look of each toolbar. This allows them to remove modules that they don't use, or arrange them to match their work flow.

Note: You may not have access to this feature. See the system administrator for details.

How To

Customize the toolbar

  1. Add the desired toolbars to Lucity
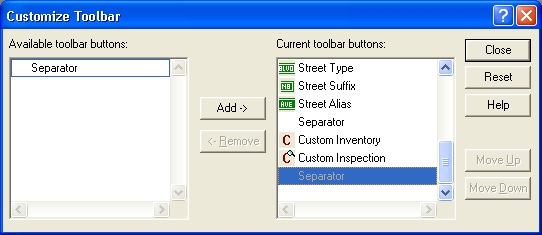
  2. Right - click on a toolbar and select Customize Toolbar. The Customize Toolbar tool will appear:

    Customize Toolbar

  3. The left box is the Available toolbar buttons box and displays objects that can added to the toolbar.
  4. The right box is the Current toolbar buttons box and displays objects that are currently part of the toolbar

    Adding Buttons

    Adding Spaces between buttons

    Removing Buttons

    Rearranging the order of Buttons

    Resetting the toolbar back to Default Settings

  5. All changes made in this tool are automatic
  6. Click Close when complete.

In This Section

Adding Buttons

Removing Buttons

Adding Spaces Between Buttons

Rearranging the Order of Buttons

Resetting the Toolbar Back to the Default Settings

See Also

Main Toolbars

Viewing Toolbars