![]() The Lucity GIS Edit tools include a tool for merging water pipes in the geodatabase and in the desktop.
The Lucity GIS Edit tools include a tool for merging water pipes in the geodatabase and in the desktop.
Note: The Water Merge Tool is only enabled if all of the following conditions are met: (1) There are two features selected in the map (2) The features selected are linear (3) The features are snapped
How To
Merge pipes in the map:


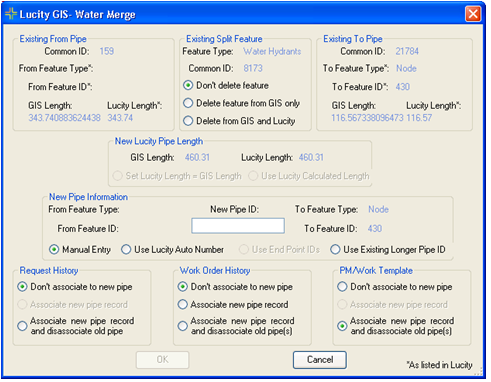
Existing From Pipe: This is read-only information about the pre-merged from pipeExisting Split Feature: This is the existing water split feature information and lists the merge options this feature.Don't Delete Feature: Select this option to keep the structure in both the desktop inventory module and in the feature class.
Delete Feature From GIS Only: Select this option to keep the structure in the desktop inventory module, but remove the feature from the feature class. Note: This option is disabled if the tool was unable to locate a water asset within 1 map unit of the common end point for the two pipes or if the water asset feature class is not editable.
Delete from GIS and Lucity: Select this option to remove the structure from both the desktop inventory module and the feature class. Note: This option is disabled if the tool was unable to locate a water asset within 1 map unit of the common end point of the two pipes, the water asset feature class is not editable, or the asset doesn't exist in the desktop inventory module.
Existing To Pipe: This is read-only information about the pre-merged to pipeNew Lucity Pipe Length: If the tool finds a conflicting pipe length (i.e. the Lucity Length is different from the GIS Length for the newly merged pipe), there are two options: Users can set the length in the desktop to the length found in the map, or they can proportionally split the pipe in the desktop. If the Lucity Length and GIS Length are the same, this section will be disabled.New Pipe Information: Provides information about the new Pipe. users also need to fill out the New Pipe ID field. They can either manually enter a new pipe ID number, use the existing longer pipe ID, use end point IDs, or if this feature class is set up for auto-numbering the "Use Lucity Auto Number" button will be enabled.Request History: Users can choose to not associate the Requests with the new pipe, or disassociate the Requests from the old pipe and associate them to the new pipe (only one asset can be associated to each Request). The Associate New Pipe Record option is disabled. It will be made available for a future release.Note: Requests can only be associated to the new pipe, not the old. If Don't Associate to New Pipe is selected, the old pipe IDs will still be displayed in the Request but will no longer be linked to the Pipe Inventory records. If Associate New Pipe Record and Disassociate Old Pipe is selected, all Requests related to either pipe will be associated to the new pipe.
Note: If Don't Associate to New Pipe is selected, the old pipe IDs will still be displayed in the Work Order Assets tab, but will no longer be linked to the Pipe Inventory record. If Associate New Pipe Record is selected, the Work Order Assets tab will display the old and new pipe IDs, but only the new pipe ID will be linked to the Pipe Inventory record. If Associate New Pipe Record and Disassociate Old Pipe is selected, the new and old pipe IDs displayed in the Work Order will be changed to the new pipe ID, and all will be linked to the same Pipe Inventory record.
PM/Work Template: Users can choose to not associate the PMs with the new pipe, or disassociate the PMs from the old pipe and associate them to the new pipe. The latter option is selected by default. The Associate New Pipe Record option is disabled.Note: If Don't Associated to New Pipe is selected, the old pipe IDs will be removed from all PMs. If Associate New Pipe Record and Disassociate Old Pipe is selected, the old pipe IDs will be removed from all PMs and the new pipe IDs will be added.
