The Split tool enables users to split Sewer, Storm, Distribution Water, Recycled Water or Raw Water pipes—both in Lucity and in the geodatabase. If desired, the tool will add a new featureat the split point.
Note that the Split tool works only when a single linear asset is selected in the map.
Using the mouse, click the position on the line at which the Pipe should be split. (The pointer should automatically snap to the line.) If the Structure that will split the Pipe already exists in the structure feature class, snap the split cursor to the Structure.
Note: If you click on an existing split feature that intersects with the Pipe, the tool will attempt to use that feature as part of the split.
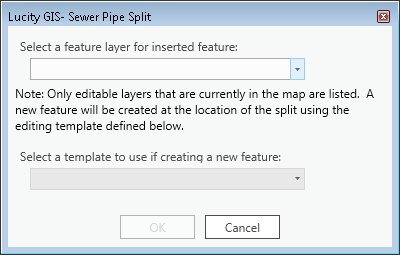
If more than one feature class for assets that can split pipes (structures, nodes, valves, etc.) exists in the map and is editable, the following dialog appears. Select the feature class that will contain the feature added at the split.
Once you have selected the type of asset that to create, you can select an editing template to use when the feature is added.
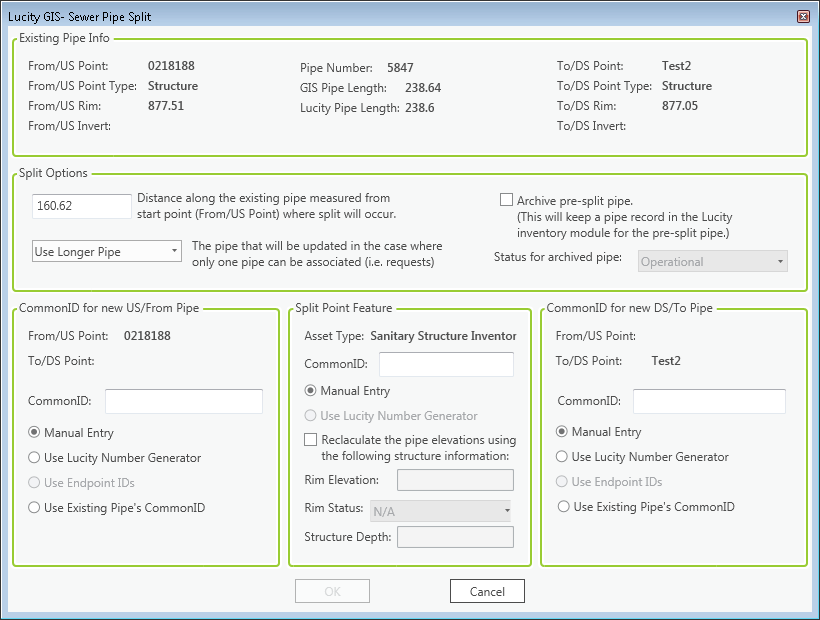
Click OK. The Sewer Split form appears:
The three sections at the top of the form display information about the existing Upstream Structure, Pipe, and Downstream Structure.
The system automatically calculates the Distance along the existing pipe measured from start point ... field based on the point you clicked on the pipe to split it. Adjust the location, if desired.
To retain a record in the Pipe Inventory for the Pipe as it was before the split, enable the Archive Pre-split Pipe option and set a Status for the archived Pipe.
Historical records that were attached to the original assets are still connected to the archived assets.
Current records (like PMs) will be connected to the resulting Pipes.
The archived Pipe cannot be shown in the map.
Users will no longer be able to create Requests, Work Orders or PM/Work Templates for the archived Pipe.
If you choose not to archive the original Pipe, certain historical records cannot be attached to both resulting Pipes (e.g., Work Requests). If applicable, choose which Pipe you prefer to attach the historical records to using The pipe that will be updated in the case where only one pipe can be associated option field.
In the Common ID for US/From Pipe section, choose whether to:
manually enter a Common ID for the new Upstream Pipe;
allow Lucity to auto-number the pipe using a Lucity Number Generator (enabled only when the option is set up in the Geodatabase Configuration tool);
Use the End Point IDs; or
Use the existing Pipe's Common ID.
In the Split Point Feature section, assign a Common ID to the new Structure by manually entering the ID or by allowing Lucity to auto-number the structureusing a Lucity Number Generator (enabled only when the option is set up in the Geodatabase Configuration tool).
Note: If a Structure already exists at the point along the line where the split is performed, the Split Point Feature section is disabled. Instead, Lucity displays the existing Structure information.
To enter Elevation and Depth information for the split feature, check the Recalculate the pipe elevation using the following structure information option.
Enter the Rim Elevation.
Set the Rim Status.
Enter the Structure Depth.
In the Common ID for DS/To Pipe section, choose whether to:
manually enter a Common ID for the new Downstream Pipe;
allow Lucity to auto-number the pipe using a Lucity Number Generator (enabled only when the option is set up in the Geodatabase Configuration tool);
Use the End Point IDs; or
Use the existing Pipe's Common ID.
After making all selections, click OK. The following message appears when the process is complete:

 on the Lucity Tools toolbar.
 How to split a Pipe