The Trace tools are designed to quickly find out information about a Sewer, Storm, or Water Network. To switch between the different trace tools click the button.
Water
Isolation Valve - Traces water pipes outward from the location the user clicked on and finds the closest water isolation valves.
Hydrants Inventory
Pipe Number
Service Taps
Pipe Number
System and Control Valve Inventory
Pipe Number
Isolation Valve (True or False)
Water Pipe Records
From End Type, From End
To End Type, To End
Sewer
Upstream – Traces all pipes upstream of a selected point.
Upstream Distance – Traces all pipes within an entered distance upstream of a selected point.
Upstream Segment - Traces all pipes within an entered number of segments upstream of a selected point.
Downstream - Traces all pipes downstream of a selected point.
Downstream Distance – Traces all pipes within an entered distance downstream of a selected point.
Downstream Segment - Traces all pipes within an entered number of segments downstream of a selected point.
Required Sewer Pipe Fields
US Structure
DS Structure
Storm
Upstream – Traces all pipes upstream of a selected point.
Upstream Distance – Traces all pipes within an entered distance upstream of a selected point.
Upstream Segment - Traces all pipes within an entered number of segments upstream of a selected point.
Downstream - Traces all pipes downstream of a selected point.
Downstream Distance – Traces all pipes within an entered distance downstream of a selected point.
Downstream Segment - Traces all pipes within an entered number of segments downstream of a selected point.
Required Storm Pipe Fields
US Structure
DS Structure
Note: Trace results for Lines and Auxiliary assets are based on relationships within Lucity. The relationships are defined using the Required fields listed above. The trace does not select assets in the map based on any sort of spatial relationship or proximity.
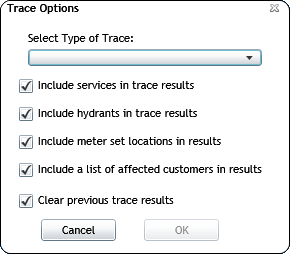
Click on a water pipe on the map. The following pop-up will appear:
Use the drop down to select the type of Water Trace to run.
Isolation Valve - Traces water pipes outward from the location the user clicked on and finds the closest water isolation valves.
Choose to enable/disable the related option:
Include services in trace results - Check this if you want the trace to select all of the Water Service lines that are attached to pipes that the trace selects.
Include hydrants in trace results - Check this if you want the trace to select all of the Water Hydrants that are attached to pipes that the trace selects.
Include meter set locations in results - Check this if you want the trace to select all of the Water Meter Locations that are attached to pipes that the trace selects.
Include a list of affected customers in results - Check this if you want the trace to customers affected by the selected pipes, hydrants, and meter locations. This causes the tool to collect the address from all selected assets and then select customers that are associated to those addresses.
Note: The Clear Previous Trace Results box must be checked to check this box.
Clear Previous Trace Results - Check this if you want to clear the selection before performing the trace. If it is unchecked it will add the results to the previous selection.
Click OK to begin the trace.
The tool automatically begins to trace outward from that pipe. It continues to trace water pipes until it comes to a valve. If the valve is marked as an isolation valve the trace highlights the valve and stops tracing pipes along that path.
Note: The tool checks the Valve record in Lucity to see if it is marked as an Isolation Valve. It does not check any information within the feature class.
The Data Table will open to display all selected records.
If you had the Include a List of affected customers in results box checked the data table will contain a special section for customers.
This is a list of contacts associated with the addresses. If there are no contacts the addresses will still be shown, they will just not display contact information.
At the top of the grid you can select an Email Notification Template from the Notification Setup module and click Send Email Notification.
The system will email all of the customers that have an email address on file.
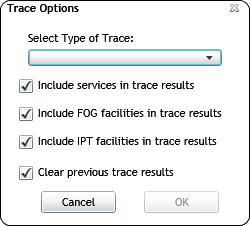
Click on a sewer pipe on the map. The following pop-up will appear:
Use the drop down to select the type of Sewer Trace to run.
Upstream – Traces all pipes upstream of a selected point.
Upstream Distance – Traces all pipes within an entered distance upstream of a selected point.
Upstream Segment - Traces all pipes within an entered number of segments upstream of a selected point.
Downstream - Traces all pipes downstream of a selected point.
Downstream Distance – Traces all pipes within an entered distance downstream of a selected point.
Downstream Segment - Traces all pipes within an entered number of segments downstream of a selected point.
If you chose a Distance or Segment trace fill in the Units field.
Choose to enable/disable the related options.
Include services in trace results - Check this if you want the trace to select all of the Sewer Service lines that are attached to pipes that the trace selects.
Include FOG facilities in trace results - Check this if you want the trace to select all of the Sewer FOG Facilities that are attached to pipes that the trace selects.
Include IPT Facilities in trace results - Check this if you want the trace to select all of the Sewer IPT Facilities that are attached to pipes that the trace selects.
Clear Previous Trace Results - Check this if you want to clear the selection before performing the trace. If it is unchecked it will add the results to the previous selection.
Click OK to begin the trace.
The tool automatically begins to trace in the desired direction.
The Data Table will open to display all selected records.
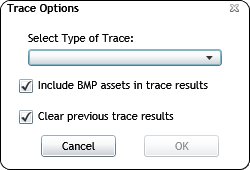
Click on a storm pipe on the map. The following pop-up will appear:
Use the drop down to select the type of Storm Trace to run.
Upstream – Traces all pipes upstream of a selected point.
Upstream Distance – Traces all pipes within an entered distance upstream of a selected point.
Upstream Segment - Traces all pipes within an entered number of segments upstream of a selected point.
Downstream - Traces all pipes downstream of a selected point.
Downstream Distance – Traces all pipes within an entered distance downstream of a selected point.
Downstream Segment - Traces all pipes within an entered number of segments downstream of a selected point.
If you chose a Distance or Segment trace fill in the Units field.
Choose to enable/disable the related option:
Include BMP asset in trace results - Check this is you want to select all BMP Assets that are related to the Storm Conduits selected during the trace.
Clear Previous Trace Results - Check this if you want to clear the selection before performing the trace. If it is unchecked it will add the results to the previous selection.
Click OK to begin the trace.
The tool automatically begins to trace in the desired direction.
The Data Table will open to display all selected records.
 How To Run a Water Trace