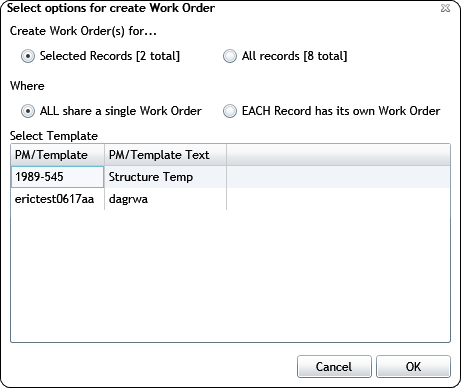
Use the Create Work Order(s) for... section to define what assets are to be used.
Selected Records - Uses only the records you highlighted on the current tab of the Data Table.
All Records - Uses all of the records on the current tab of the Data Table.
Use the Where section to specify how the work will be broken out.
All share a single Work Order - Creates one work order for all the assets.
Each Record has its own Work Order - Creates multiple work orders, one for each asset.
Use the Select Template section to choose a template to base your work order(s) off of.
Click OK.
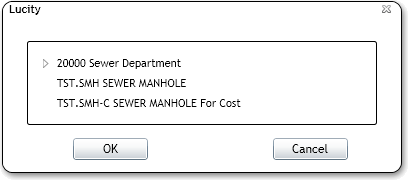
If the program can't determine a Category for the Work Order from a template or an asset's Default Work Category, the following pop-up appears to prompt the user to select a category:
When Assets are selected, only categories associated with the highlighted Asset appears.
When User Point Graphics are selected, the Category list includes all categories.
Select a Category and click OK (required). The system creates the Work Order with the highlighted Assets attached. The following pop-up appears:
Click Attach Document to browse to and select a document to attach to the Work Order (if desired).
Choose one of the Edit or View options and click OK. The selected Lucity platform opens and displays the new Work Order record.
The Edit/View in the Desktop buttons may not appear if Open in Desktop is disabled for your instance of Lucity Web.
Note: After the Work Order is created, the Work Order Number is automatically entered into the Attach to Work Order tool, so that users can quickly highlight other assets (even on other tabs) and attach them to that Work Order.
 button.