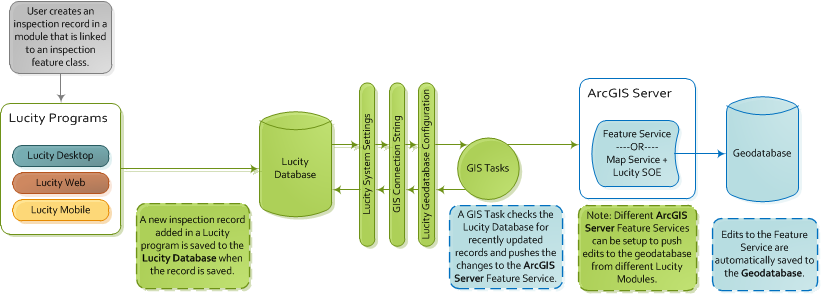
The Lucity-Inspection-to-Geodatabase integration allows edits made in LucityInspection modules to be pushed to the geodatabase.
Process
Inspections
Edits made in the Lucity interface are pushed directly into the Lucity database.
Inspections are not automatically pushed to the geodatabase; instead, they are pushed to the geodatabase using a GIS Task.
The GIS Task runs on a schedule. It checks the Lucity database for new or updated records and pushes them into a feature service, which then automatically updates the geodatabase.
Setup
Feature Service
The first step in the integration is to configure a feature service to push Inspection records from Lucity to the geodatabase.
Open ArcCatalog. In the Lucity GIS toolbar, select Geodatabase Configuration.
Select the geodatabase connection to which you'd like to add the feature class and right-click on the node.
Note: This option is not available for replica geodatabases. Instead, see the How To Associate a Feature Class section below.
Select Add Feature Class.
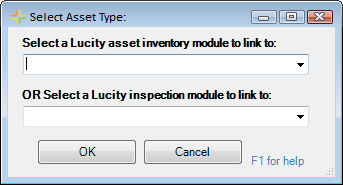
The following dialog appears:
In the second drop-down box, select a Lucity Inspection module.
Click OK. The Geodatabase Configuration is updated to indicate the new Inspection Type.
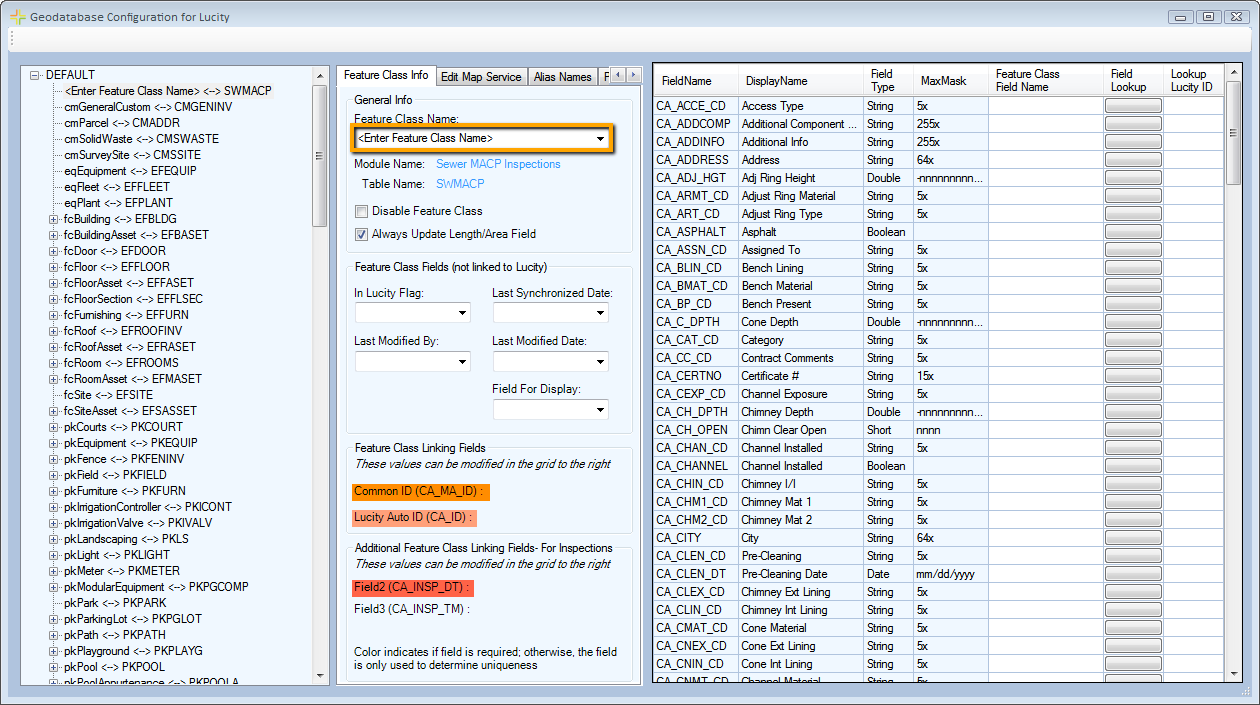
Name the new feature class configuration by either 1) typing the name in the Feature Class Name field or 2) choosing a name from the drop-down list of feature classes found in the database:
Click on a different node to save the new feature class component.
Select the new node again and complete the field-mapping configuration.
In the Geodatabase Configuration tool, select the desired feature class. A list of available Lucity fields appears on the right.
Decide which feature class field should be linked.
Look at the Lucity module and decide what fields you want to link to your GIS data. You can get the field's caption or CTRL + Right -click to view the field properties to obtain the field's name.
In the geodatabase configuration, select the feature class you are linking to Lucity.
In the grid on the right, find the Lucity field, using its field name or display name.
Map the field by:
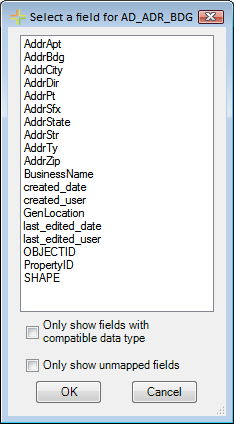
Clicking the Field Lookup button for a list of fields from the associated feature class.
The following pop-up will appear:
Click Only show fields with compatible data type to filter out fields that aren't the same type as the field you are mapping to.
Click Only show unmapped fields to filter out fields that aren't already currently mapped to.
Select a field and click OK.
Or Type the geodatabase field name in the Feature Class Field Name field.
The map service must contain the Inspection feature classes that you want Lucity to update in the geodatabase.
The feature classes must display all of the fields that are configured to link to Lucity.
The map service does not need any additional non-Lucity feature classes.
The feature service can be created using a new map service or an existing one.
The map service does not require any special symbology.
The user account used to add the data to the map service must have edit permissions for the feature classes that Lucity will update in the geodatabase.
The map service must point to the version of the geodatabase that Lucity should update.
The second part of the integration involves creating the GIS Scheduled Task that regularly updates Lucity with new GIS data. GIS Scheduled Tasks are set up in the Geodatabase Configuration tool.
After creating a GIS Scheduled Task for one feature class, an administrator can copy the task and use it for other feature classes that should be synced to Lucity on a similar schedule.
 How to point Lucity to an Inspection feature class