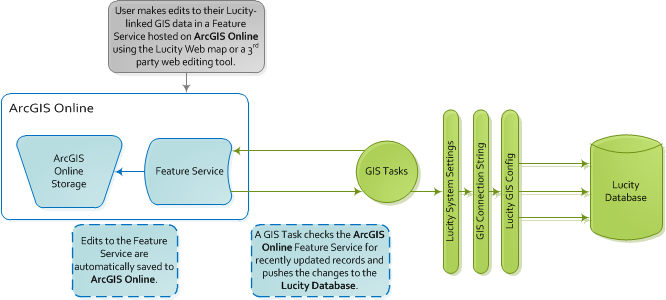
The Webmap-Editing-to-Lucity integration enables an agency to push GIS edits made in an editing environment other than ArcMap into Lucity.
Process
Inventory Edits
Edits made in the Webmap are made to a feature service that automatically updates ArcGIS Online. Such edits are not automatically pushed to Lucity. Instead, they must be pushed to the Lucity database using a GIS Task.
The GIS Task runs on a schedule. It checks the feature service for new or updated records, which are then processed and pushed into the Lucity database.
Possible Applications
The process outlined below can be used to push data from:
Lucity Webmap > Lucity
Lucity Mobile map > Lucity
Collector for ArcGIS > Lucity
Any other third-party mapping application > Lucity
Setup
Feature Service
The first step in the integration is to create a feature service that will allow users to edit your GIS data. The configuration can use the same feature service that was used to link ArcGIS Online feature class layers to Lucity modules as part of the Lucity-to-ArcGIS-Online configuration.
When users have permission to edit a feature service, they can edit any feature classes in that feature service. Therefore, when configuring webmap editing, it is customary to use multiple feature services each containing a set of data. For example, an agency might have a Sewer feature editing service that contains sewer pipes, structures, and nodes, but does not include Storm features. This method of configuration offers flexibility and allows an agency to provide one set of editable data in one map and a different set of editable data in another.
The service(s) should include all feature class layers that you would like to edit.
Each feature class layer that you link to Lucity must have the unique, user-friendly name that was used when the layer was originally configured with Lucity.
The feature layers must display all of the fields that you have linked to Lucity.
The service can either be a new service or an existing one.
Hover the mouse over the desired Feature Service and click Details.
On the Details page, find the Source: Feature Service. Click Feature Service to open the service's metadata.
Copy the URL.
Add the feature service to Lucity.
Go to Lucity Administration Tool > GIS > Map Services.
Add a new map service, and enter the REST URL for the feature service.
Check the Has Feature Service? box.
Save changes and close.
Users need the Lucity App Admin > Run permission to access this section of the Lucity Administration tool.
GIS Scheduled Task
The second part of the integration involves creating the GIS Scheduled Task that regularly updates Lucity with new GIS data. GIS Scheduled Tasks are set up in the Geodatabase Configuration tool.
Click the Add New GIS Task button. A new record appears in the grid.
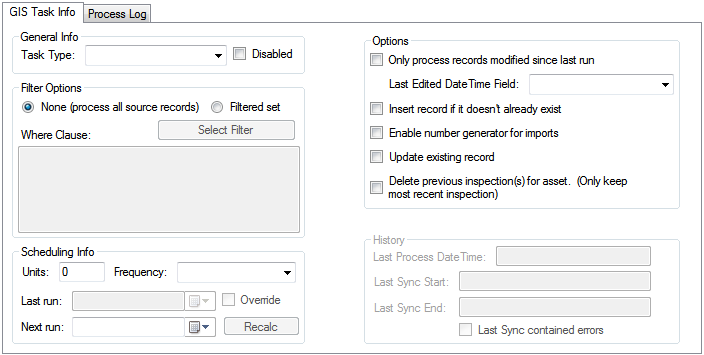
Select the record in the grid and complete the GIS Task Info section at the bottom.
Under General Info, select the desired Task Type:
Sync - Lucity to GIS - Pushes Inspection data from Lucity to an Inspection feature class layer.
Sync - GIS to Lucity - Pushes any data from the feature class layer to Lucity.
Under Filter Options, select which records the Task will process when it runs:
None - Directs the Task to consider all records when syncing.
Filter Set - Directs the Task to consider only records that meet the criteria of a particular filter.
Select Filter - Choose an existing Lucity filter from the related module.
Under Scheduling Info, indicate how often the Task should run.
Units - Indicate the number of minutes, hours, days, or months that will pass between runs.
Frequency - Select whether the units represent minutes, hours, days, or months.
Last Run - Displays the date on which the Task was last run. (The system automatically completes this field.)
Override - Allows the user to manually modify the Last Run date.
Next Run - Displays the next date/time the Task will run. (The system automatically calculates this field based on the Last Run, Units, and Frequency fields.)
Click the Recalc button to calculate the Next Run date using the Units, Frequency and today's date.
Under Options, set how the GIS Task should behave when populating the feature class:
Only process records modified since last run - Directs the Task to check the records' Last Modified dates. Only records (in the filter set) that were modified since the Last Run date are synced.
Last Edited DateTime Field - Directs the Task to store the date/time that the record was last edited (typically the ESRI Editor Tracking field). This option is only enabled when the Only Process records modified since last run option is checked and the Task Type is Sync- GIS to Lucity.
Insert record if it doesn't already exist - Tells the Task to add any new records to the destination.
Enable number generator for imports - Directs the Task to assign numbers to assets using a Lucity GIS Number Generator related to the feature class.
Update existing record - Tells the Task to update existing records with new attribute data.
Delete previous inspection(s) for asset. (Only keep most recent inspections) - Directs the Task to delete any Inspection in the feature class that is not the most recent Inspection for an asset. The option is helpful if an agency wants the feature class to contain only the most recent Inspection for each feature. (Enabled only when the Task Type is Sync- Lucity to GIS.)
Click on a different part of the tool to save changes.
Note:History section - This section contains information about the last time the GIS Task ran.
 How to configure an ArcGIS Online feature service for editing