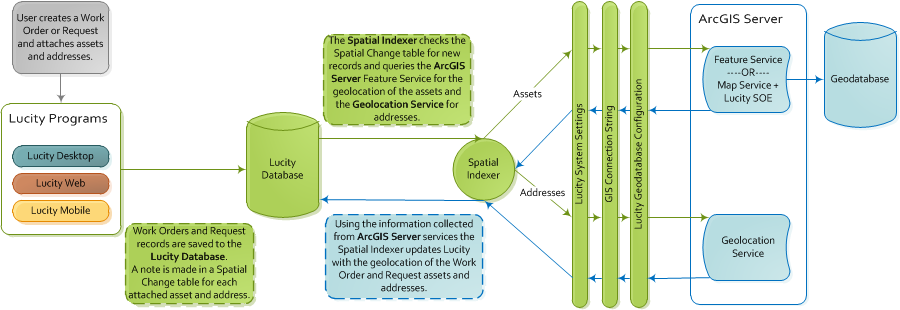
The Lucity Spatial Indexer reviews addresses, coordinates, and assets on Work Orders and Work Requests and stores the related spatial information in a special table. This data can then be viewed using special Lucity GIS tools.
Setup
The Spatial Indexer setup consists of three parts: 1) The general configuration process, 2) the asset configuration process and 3) the address configuration process.
General Configuration
Complete the following steps for each user who will use the Spatial Indexer:
Open Lucity Web and open the Admin Portal > Settings > System Settings > General section.
Make sure the Enable Lucity Spatial setting is enabled.
Use the Max amount of days to process spatial history setting to determine how far back into the work history the Indexer should look for records to process. Example: If you enter 180 in this field, the Indexer will process all Work Orders/Requests from today and those created within the last 180 days.
Note: The Spatial Indexer relies on back-end tables added to Lucity in version 7.4. Therefore, the Indexer can only process Work data added after an agency upgraded to version 7.4 or greater.
Asset Configuration
The asset configuration process uses some of the same feature services (both the default and alternate feature services) as the Lucity-to-geodatabase integration and the webmap-editing-to-Lucity integration. If these integrations have already been configured, skip this step.
If collecting information for the map service that contains your operational data, click on the REST URL. A page containing the properties of the map service appears.
Scroll down and copy down theSpatial ReferenceNumber. (Do this only for the layer that contains Lucity data.)
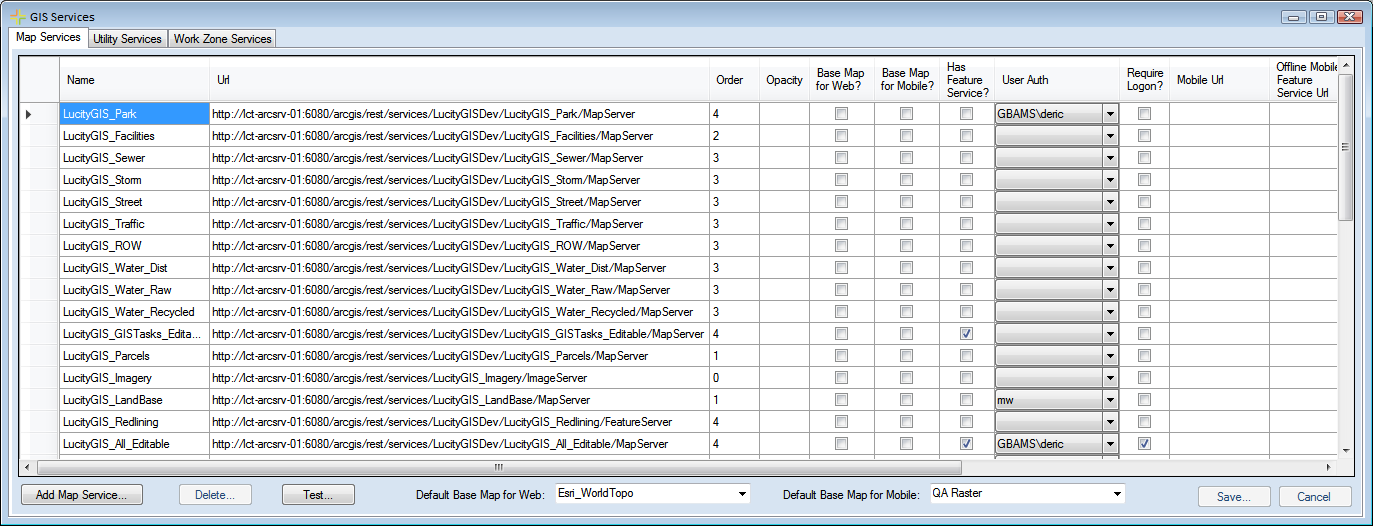
Launch the Lucity Administration Tool and select GIS > GIS Services.
On the Map Services tab click the Add Map Service button.
Enter a Name and the REST URL of the map service.
Note: This URL should end in /MapServer.
Check the Has Feature Service? box. This tells the map that the layer has an attached Feature Service.
Fill out other fields as necessary.
Click the Save button.
Note: If you are modifying an existing map service to have editing capabilities you just need to mark Has Feature Service? box for the existing record in the Map Service setup.
Close the GIS Services tool
Point Lucity to the feature service.
Open Lucity Administration Tool > GIS > Connection Strings.
Find the connection string that links to the same data that the feature service does.
Use the Editable Map Service dropdown, select the map service that you added to the map services grid.
Configure Lucity to recognize that it is using a feature service.
Open Lucity Web > Admin Portal > Settings > System Settings > GIS Edit Integration section.
Make sure the Use Feature Service instead of Lucity SOE setting is set to TRUE.
Users need Lucity App Admin > Run permission to access this section of the Lucity Administration tool.
If collecting information for the map service that contains your operational data, click on the REST URL. A page containing the properties of the map service appears.
Scroll down and copy down theSpatial ReferenceNumber. (Do this only for the layer that contains Lucity data.)
Launch the Lucity Administration Tool and select GIS > GIS Services.
On the Map Services tab click the Add Map Service button.
Enter a Name and the REST URL of the map service.
Note: This URL should end in /MapServer.
Check the Has Feature Service? box. This tells the map that the layer has an attached Feature Service.
Fill out other fields as necessary.
Click the Save button.
Note: If you are modifying an existing map service to have editing capabilities you just need to mark Has Feature Service? box for the existing record in the Map Service setup.
Close the GIS Services tool
Configure the feature class(es) to use an alternative feature service.
Single Feature Class/Single Alternative Feature Service:
If collecting information for the map service that contains your operational data, click on the REST URL. A page containing the properties of the map service appears.
Scroll down and copy down theSpatial ReferenceNumber. (Do this only for the layer that contains Lucity data.)
 How to configure the feature service