The Segment Split tool is used to divide a Street Segment.
To split the street in both the geodatabase and in Lucity, the user must use Lucity's Segment Split tool to make the change, not the ESRI split tool. The Lucity tool is enabled only when: 1) one feature is selected in the map; and 2) that feature is linear.
How To Split a Street Segment in the Map
Start an edit session in ArcMap.
Select a Street Segment in the map.
Click the Segment Split tool on the Lucity GIS Edit toolbar.
The Segment Split tool requires the system to save edits before and after performing the split. When one of the following prompts appears, click Yes.
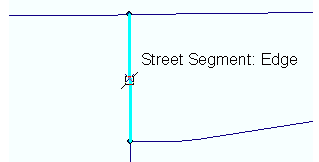
Using the mouse, click the position on the line at which the split should occur. (The pointer should automatically snap to the line.)
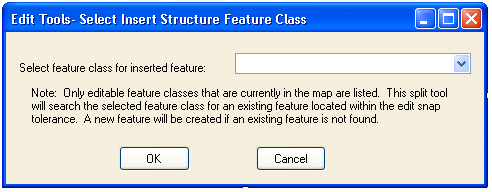
If more than one editable Street Intersection feature class exists in the map, the following dialog appears. Select the feature class that will contain the intersection.
Inserting an Intersection is not required. Step 10 explains how to split Street Segments without creating an Intersection.
If an Intersection feature already exists at the location of the split, the tool will not create a new Intersection; instead, it associates the new Streets with the existing Intersection.
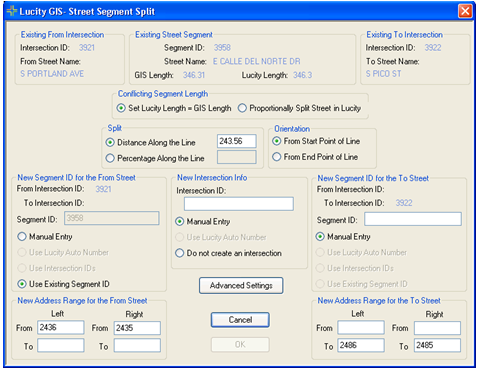
Click OK. The Street Segment Split form appears:
The three sections at the top of the form display information about the existing From Intersection, the existing Street Segment, and the existing To Intersection.
In the Conflicting Segment Length section, choose whether to Set Lucity Length = GIS Length or to Proportionally Split Street in Lucity to match the split in GIS. (These options are enabled only when the Length of the Segment differs between Lucity and the geodatabase.)
Split (Required): This is the calculated distance along the line where the mouse-click occurred. This value can be overwritten.
Orientation: Indicates the direction from which the split location is measured.
In the New Segment ID for the From Street section, choose whether to:
manually enter a Segment ID for the new Street Segment;
allow Lucity to auto-number the Segment (enabled only when the option is set up in the Geodatabase Configuration tool),
use the Intersection IDs (enabled only when an intersection is defined), or
use the existing Segment's ID. (By default, the longer street segment is assigned the existing segment’s ID; however, the user can overwrite this default.)
In the New Intersection Info section, choose whether to:
manually enter the Intersection ID,
allow Lucity to auto-number the Intersection (enabled only when the option is set up in the Geodatabase Configuration tool),
split the street section without creating an intersection feature.
Note: If an existing intersection was found at the location of the mouse-click, this section is completed automatically and is read-only. If there aren't any editable intersection feature classes configured with Lucity within the map, this section will be disabled and the Do not create an intersection option will be checked.
In the New Segment ID for the To Street section, choose whether to:
manually enter a Segment ID for the new Street Segment;
allow Lucity to auto-number the Segment (enabled only when the option is set up in the Geodatabase Configuration tool),
use the Intersection IDs (enabled only when an intersection is defined), or
use the existing Segment's ID. (By default, the longer street segment is assigned the existing segment’s ID; however, the user can overwrite this default.)
New Address Range for the From Street (Optional): Enter the address info for the new From street segment. Note: The Left From and Right From address values are prepopulated with the values used before the street was split.
New Address Range for the To Street (Optional): Enter the address info for the new To street segment. Note: The Left To and Right To address values are prepopulated with the values used before the street was split.
Click the Advanced Settings button to hand-pick which module associations should be updated when the Street Segments are split.
Click OK after making all selections. The following message appears when the process is complete: