The Water Split tool (on the Lucity GIS Edit toolbar) enables users to split Water Pipes in the geodatabase and in Lucity.
This tool is enabled only when: 1) one feature is selected in the map, and 2) it is linear.
How To Split Water Pipes in the Map
Start an edit session in ArcMap.
Using the ESRI select tool, select the Water Pipe you wish to split in the map.
Click the Water Split tool on the Lucity GIS Edit toolbar.
The Water Split tool requires the system to save edits before and after performing the split. When prompted regarding the save (examples below), click Yes.
Click the position on the line at which the split should occur. (The pointer should automatically snap to the line.) If the Water Asset that will split the Pipe already exists in that asset's feature class, snap the split cursor to the asset.
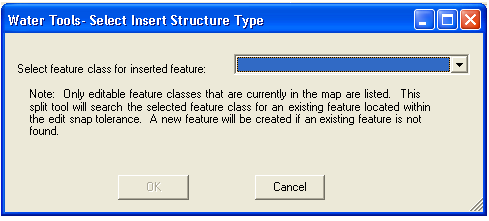
If more than one editable Water Asset feature class exists in the map, the dialog below appears. Select the feature class that will contain the split Asset type:
The Water Split tool searches the selected feature class for an existing feature located within the edit snap tolerance. If no feature is found, the system creates a new feature of the type selected.
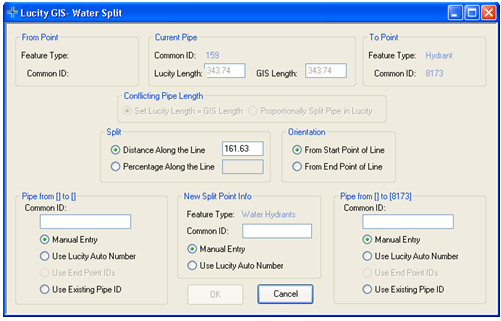
Click OK. The Water Split form appears. The three sections at the top of the form display information about the From Point of the existing Water line, the Current Pipe, and the To Point of the existing Water line.
In the Conflicting Pipe Length section, choose whether to Set Lucity Length = GIS Length or to Proportionally Split Pipe in Lucity to match the split in GIS. (These options are enabled only when the Length of the Pipe differs between Lucity and the geodatabase.)
In the Split section, indicate either the Distance or Percentage Along the Line at which the split should occur. By default, the tool displays a measurement based on the point the user clicked in the map. (This section is disabled if a feature exists within the edit snap tolerance. In such cases, the Split distance is predetermined.)
In the Orientation section, choose whether the split distance or percentage is calculated from the Start or End Point of the Line. (The option is disabled if an existing feature was found.)
In the bottom-left and -right corners of the dialog are two Pipe from [] to [] sections. Identify the Facility IDs for the two new pipe records by choosing to:
Manually enter a New Pipe ID for each Pipe,
Use the Lucity Auto Number function (enabled only when the feature class uses a number-generator), or
Use the End Point IDs, or
Use the Existing Longer Pipe ID.
In the New Split Point Info section (bottom center), enter the Facility ID for the new feature inserted at the split point by choosing to:
Manually enter an ID or
Use the Lucity auto-number function (enabled only when the feature class uses a number-generator).
Note: The New Split Point section is disabled if the system finds an existing feature within the edit snap tolerance. In such cases, the Facility ID is predefined.
Click OK when all selections have been made. When the split process is complete, the following window appears:
Note: If you renumber both new Pipe sections (i.e., if you don't retain the original Pipe Number), the original Pipe is assigned the Pipe ID of the longer of the two new Pipe sections. Any Water associations, Work Orders, Requests, and PMs associated with the original Pipe are associated with the new Pipe record; however, they retain the original Pipe ID. The system associates both Pipe sections with existing Work Orders and PMs.