Client Maintenance is an administrative tool used to manage database and client information related to the installation. It is an integral part of the installation and maintenance processes because it ensures proper connectivity and licensing. More information about Client Maintenance >>
When the installer launches Client Maintenance or a user launches it as a stand-alone product, the following window appears:
In the Config Folder field, specify the path to the Lucity Config folder.
In the License File field, specify the path to the provided license file.
Enter the the Admin DB Login ID and the Admin DB Password. If multiple SQL Server/Oracle installations exist, with different credentials for each, enter the credentials for one of the installations. The system will prompt for the others later.
Check the Use Windows NT Integrated Security checkbox if you wish to connect to the database servers via Windows Authentication and the database servers have already been properly configured.
Click Next. The utility begins updating the Lucity configuration information.
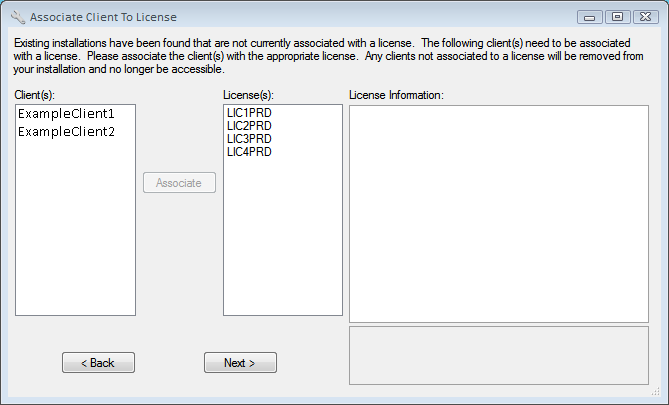
During multi-client installations, if the Client Maintenance tool is unable to determine which licenses are associated with which clients, the following screen will appear immediately after login:
This screen allows users to associate existing client installations to the appropriate license in the agency's License file.
How to Map Licenses to Clients
To determine which license should be associated with the currently installed client, highlight a License in the list in the middle of the screen. The License Information grid on the right will indicate which products will be enabled by the selected license.
To associate a client with a license, select a Client from the first list and a License from the second list.
Click the Associatebutton.
Note: Any clients not associated with a license will be removed from the configuration. (The associated database will not be removed; however but it will be inaccessible via Lucity.)
Note: Licenses are designated either as Production (PRD) or Non-Production (NPR).
Once all installed clients have been associated with the appropriate licenses, click Next >.
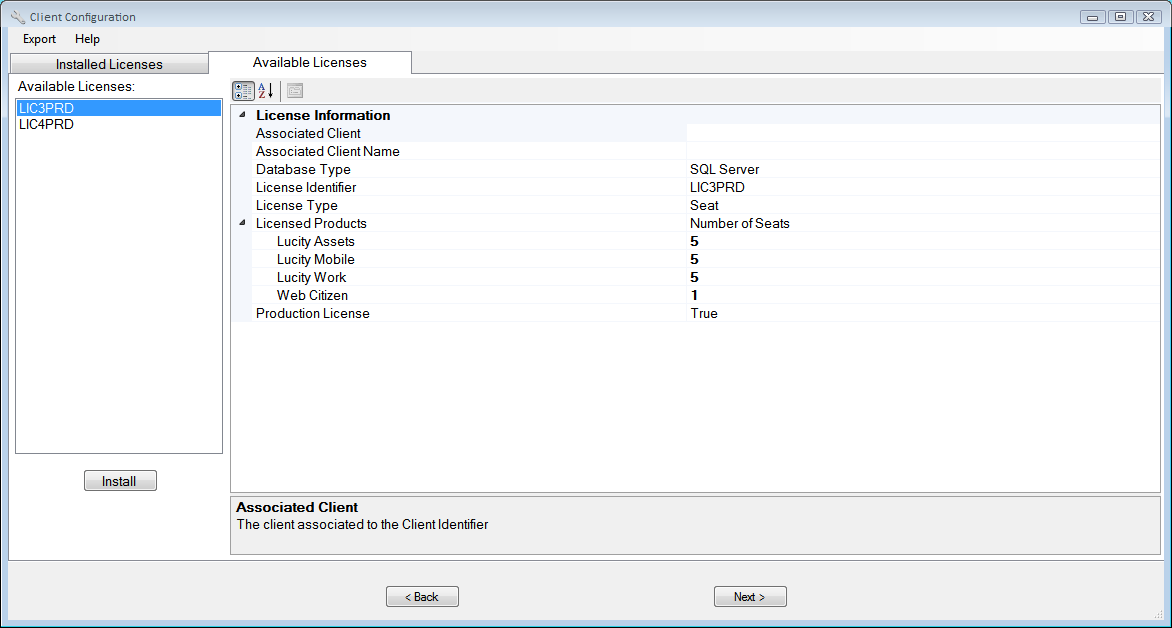
After Client Maintenance loads click the Available Licenses tab at the top of the screen.
On the left is a list of licenses that are available (stored in LicensesCodes.xml), but not currently installed. Select a license on the left to view its properties in the window on the right.
Note: Licenses marked PRD are for Production use. Licenses marked NPR are meant to establish Test or Development environments.
To install a license, highlight it in the window on the left and click the Installbutton. The following window appears:
Provide a user-friendly name for the license and click Ok. (For example, you could use the name of the agency or department that will use this license).
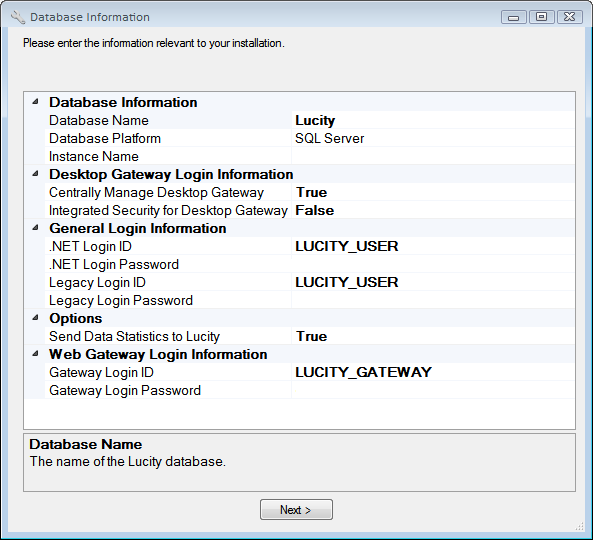
In the form that appears, enter connection information for the database.
Database Information - Specifies the location of the database(s).
Database Name - Enter the actual name of the database to connect to.
Database Platform - The system automatically completes this field based on the selected license file. If the platform is incorrect, contact Lucity Support.
Instance Name - Enter the name of the SQL Server or Oracle Server instance.
General Login Information - Indicate the login credentials the Lucity programs should use to connect to the database.
.NET Login ID - Enter the Login ID that any Lucity application developed with Microsoft.NET should use to connect to the database. This login information is retrieved via the Gateway Login account.
.NET Login Password - Enter the Login Password that any Lucity application developed with Microsoft.NET should use to connect to the database. This login information is retrieved via the Gateway Login account.
Note: The .NET credentials are persisted to the Lucity database.
Legacy Login - Enter the Login ID that any Lucity application not using .NET (older) should use to connect to the database.
Legacy Login Password - Enter the Login Password that any Lucity application not using .NET (older) should use to connect to the database.
Note: The Legacy credentials are persisted to GBALogin.mdb in the central CONFIG directory.
Web Gateway Login Information - Required for all clients, regardless of whether they use the Lucity Web applications. Client Maintenance uses the information provided to generate a new SQL Server or Oracle account and assign permissions for it. Changing the data in these fields (e.g., entering a new password) will update the information in SQL Server. Clients who use the any of Lucity web applications, however, must also go to each of their virtual directories and make such changes there (or re-install the Web apps).
Gateway Login ID - Enter the Login ID required to connect to the GBAUser database to retrieve connection information for the Lucity databases. If the Integrated Security for Desktop Gateway option is set to False, both Lucity Web and Lucity Desktop applications will use this account.
Gateway Login Password - Enter the Login Password required to connect to the GBAUser database to retrieve connection information for the Lucity databases. If the Integrated Security for Desktop Gateway option is set to False, both Lucity Web and Lucity Desktop applications will use this account.
Note: The Gateway Login Password should be at least 8 characters in length.
When all fields have been completed, click Next >.
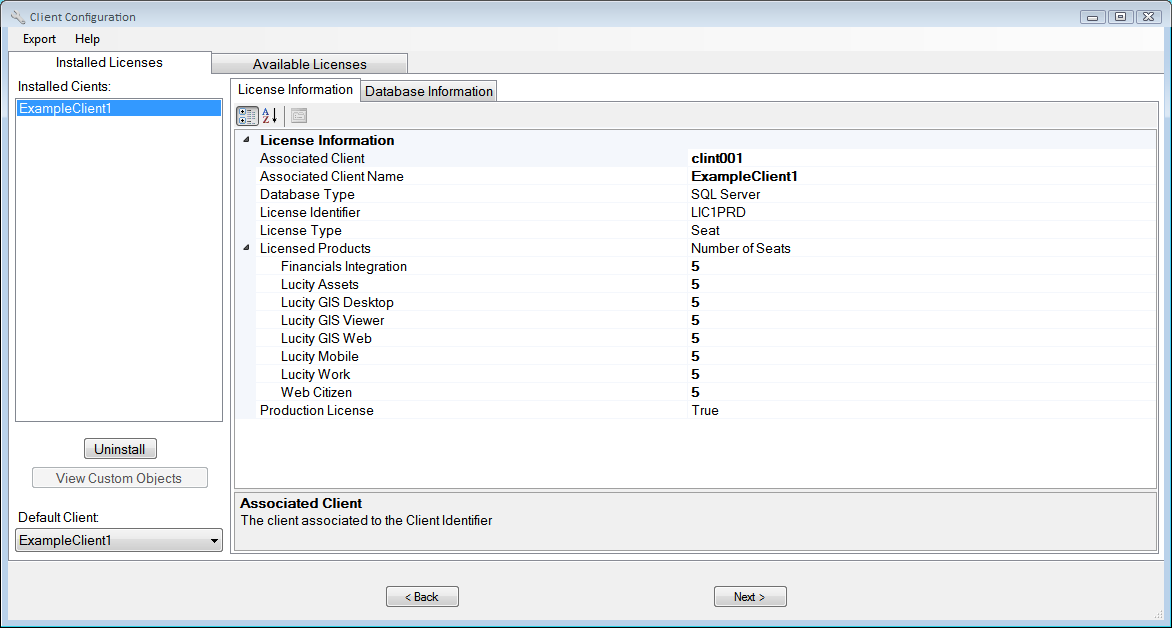
Click the Installed Licenses tab at the top of the tool.
You should see your newly installed client in the list.
Select the Installed Licenses tab. A list of the installed clients appears on the left:
Select a client to view the corresponding License Information.
Click through the database tabs to review the related database configuration information. The Default Client drop-down field in the bottom-left indicates which client each Lucity application will open by default.
Review all information. When finished, click Next > to move on to the database update.
The Database Update process is used to evaluate each database and perform any updates necessary to ensure that the software is current.
Note: This process is critical. Please read the Database Update screen carefully.
Review the information displayed. As a database is selected in the table, related information is displayed in the box on the right.
If the information appears to be correct, click Update, and the Database Update process will begin.
If the information is incorrect, click the < Backbutton. The program will return to the Client Configuration screen, where the user may modify the setup.
As each database is processed, several status screens appear. You'll also notice that the navigation buttons are disabled, and the Stopbutton is enabled. Clicking Stopdoes not terminate processing of the current database; rather, it prevents any additional database processing after the current database is complete.
The Database Status changes to OK when a database is processed without error. If an error does occur:
an error message dialog appears,
the error is recorded in the Error Message column of the grid, and
an error log file is generated.
When the Database Update process is complete, users can click the Email Errors to Lucity option to create an email message with the error and configuration information attached. Be assured that no password information is stored in the configuration information sent to Lucity.
Click the Finish >>|button when the entire Update process is complete to save the configuration information and exit Client Maintenance.
Note: If you click the Finish >>|button before clicking Update, the system will skip all database processing. This is not recommended.
The rest of the Server/Database installation will be completed.
 Login
Login