![]()
The Export Current View tool allows users to export all of the data in the current view to a CSV file and email it to themselves or another person. The tool creates an export of the data and saves it to a temporary directory on the server. Then, it zips up the file and sends an email with the zip file attached. The temporary files are eventually purged.
What is exported? |
All records in the current filterset are exported displaying all columns in the current grid. |
How is it sorted? |
The records in the export are sorted based on how the grid is sorted at the time of export. |
Format |
Comma delimited file (.csv) in a zip file (.zip). |
![]() Requires the Browse permission for the module the export is coming from.
Requires the Browse permission for the module the export is coming from.
To use the tool, click the ![]() button. The following window appears, displaying settings for the export.
button. The following window appears, displaying settings for the export.
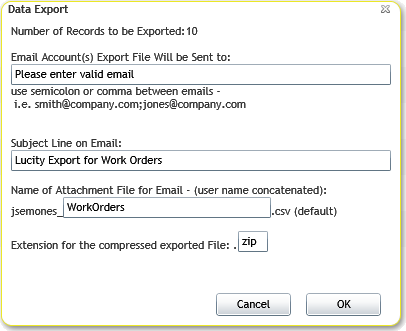
Number of Records to be Exported |
A count of the records identified for export. |
Email Account(s) Export File will be Sent to |
A list of email addresses to which the export should be sent. Use a comma (,) or semicolon (;) to separate email addresses. |
Subject Line on Email |
A summary of the content of the export, which will appear in the message's subject line. |
Name of Attachment File for Email |
The name of the export file. By default, the file is named [Current Username]_[Module Name].csv. The [Module Name] can be modified; however, the [Current Username] cannot be changed. This precaution ensures that the file saved on the server has a unique name and does not overwrite another user's file. |
Extension for the compressed exported file |
Allows the user to change the name of file extension for the zip file. This feature is useful for agencies that block emails with .zip attachments. Change the extension to anything that will make it through the email filter. Then, when the email is received, change the file extension back to .zip to open it. |
Cancel |
Cancels the export. |
OK |
Accepts settings and exports the files. |
How To Export