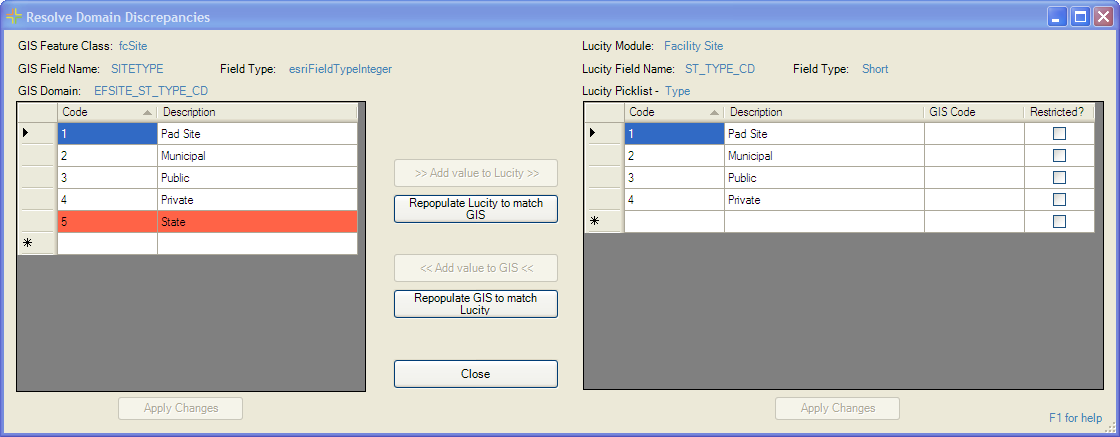
When configuring Lucity pick-lists and GIS domains, users can choose to manage each individual picklist/domain grouping. When users click the Manage button in the Validation Results grid, a form appears that enables users to:
manually edit the pick-list and domain,
sync values from the domain to the pick-list,
sync values from the pick-list to the domain, and
match codes for pick-list values that have mismatched codes.
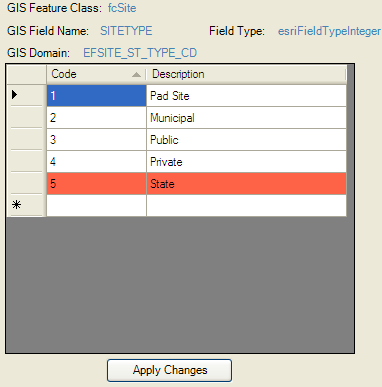
GIS Feature Class
Identifies the feature class linked to the Lucity module on the right.
GIS Field Name
Identifies the field associated with the GIS domain.
Field Type
Indicates the ESRI field type.
GIS Domain
Identifies the name of the domain stored in the geodatabase.
Domain Grid
Lists all of the domain values available to users to complete the field.
The grid shows the Code field (the value that is actually stored in the geodatabase) and the Description (the value that is displayed in ArcMap whenever users view a feature's attributes).
Sort the grid by clicking on the column headers.
Values that highlighted in red indicate discrepancies with the Picklist Grid.
Use the row marked with an asterisk (*) to manually enter a new value into the domain.
Apply Changes
Saves any changes made in the Domain Grid.
>> Add value to Lucity >>
Adds the value selected in the Domain Grid to the Picklist Grid.
Repopulate Lucity to match GIS
Overwrites all values in the Picklist Grid (at right) with the values from the Domain Grid (at left). If a Lucity pick-list value cannot be overwritten, the tool attempts to find its match in the list and link the hard-coded Lucity value to a matching domain value of a different code.
Note: If the Lucity pick-list is changed using this tool, the existing data in Lucity will not be updated to match the new pick-list values.
<< Add value to GIS <<
Adds the value selected in the Picklist Grid to the Domain Grid.
Repopulate GIS to match Lucity
Overwrites all values in the Domain Grid (at left) with the values from the Picklist Grid (at right).
Close
Closes the window and returns to the Domain Configuration window.
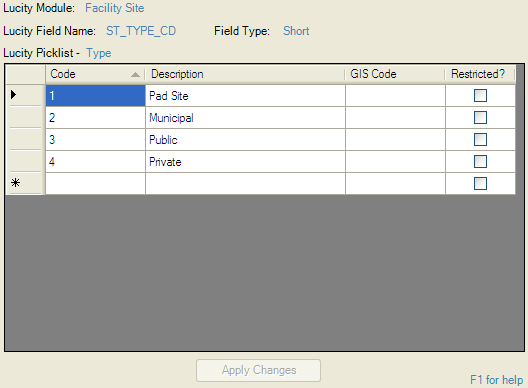
Lucity Module
The name of the module linked to the Feature Class on the left.
Lucity Field Name
The field the picklist is for.
Field Type
The database field type.
Lucity Picklist
The type of picklist being used
Picklist Grid
This Grid contains a list of all the domain values that users can pick from when filling out the field.
The grid shows the Code field and the Description.
The GIS Code field is used to link a Lucity Value to a Domain value with a different code. This is used when neither the picklist nor domain values can be changed. It can also be used to link together number picklists/domains to alpha-numeric ones.
The Restricted? field is a read-only field that marks whether a specific picklist value is hard coded or not.
The grid can be sorted by clicking on the column headers.
Values that highlighted in red are Discrepancies with the Domain Grid.
Use the field marked with a * to manually enter a new value into the domain.
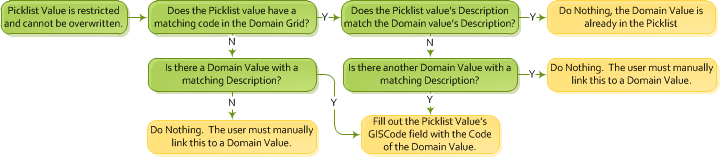
The GISCode field is designed to allow administrators to link different domain/picklist values together when the codes do not match and cannot be changed. The following example explains how this works. This works for linking numbered and alpha-numeric code values together as well.
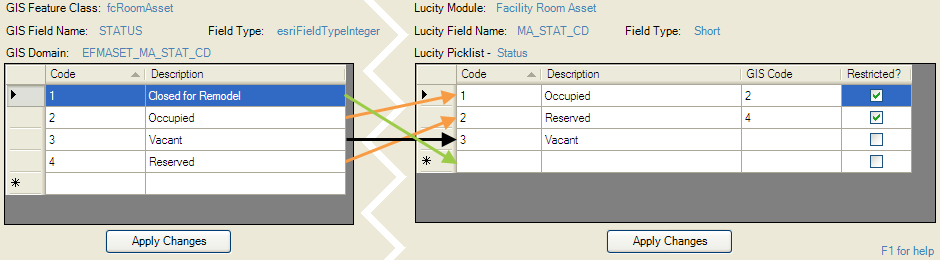
In this example the GIS Domain List and Lucity Picklist are different. Two of the Lucity values are Restricted and Cannot be changed. The agency doesn't want to change the domain they use because it is a standardized list that other parts of the organization use as well. To make the picklist work they use the Domain Configuration and click the Manage button for this particular Domain/Picklist link. Each of the values Must be linked in the following ways:
1 - Closed for Remodel can't be imported into the Lucity Picklist because the value 1 - Occupied is Restricted and cannot be changed. A new value can be created in the Lucity Picklist with the following values: Code = 4, Description = Closed for Remodel, GIS Code = 1. (Green Arrow)
2 - Occupied must be linked to 1 - Occupied which is Restricted. This is done by adding 2 into the GIS Code field for the picklist value 1 - Occupied. (Top Orange Arrow)
3 - Vacant is the same in both picklists, therefore it is already in sync. (Black Arrow)
4 - Reserved must be linked to 2 - Reserved which is Restricted. This is done by adding 4 into the GIS Code field for the picklist value 2 - Reserved (Bottom Orange Arrow)
Once this configuration is set, the codes will automatically be translated during any Lucity process where picklist values are passed between Lucity and the GIS for this field.
Note: If a Lucity Picklist is changed the existing data in Lucity will not be updated to match the new picklist values.
 How To Copy a value from one Grid to the other