At the top of the module window you will see header data. This data remains at the top of your screen as you use the tabs to navigate through the record. The header fields are described in the table below:
Field Name
Definition
Work Order #
When a work order is saved, the system automatically enters a Work Order# in this field. This number allows you to track the work order. The number format is setup in Work Options.
Status
This field is automatically populated when a new work order is created. This code-description pick list features two parts: the number code and the status description. You can create your own status codes using any combination of numbers (up to three digits) that are not already in use; however, these codes will not be automatically populated in the Status Field. A few commonly used status codes are pre-defined for you. See the Status Code-Description table below for more details.
Note: Any status code greater than or equal to 952 is considered completed.
Status Date
This field is automatically populated with the date and time the work order was entered. Date and time are based on your workstation's calendar and clock and will not appear in the field until you have saved the record. You can modify the date fieldby clicking the drop-down menu and selecting another date from the calendar.
Note: You must bein Edit Mode to modify data.
Status Code-Description
Functionality
2 = New Work Order
When you create a new work order, the number code 2 New Work Order is automatically populated in the Status field upon saving the work order.
941 = On Hold
When you select this status for a work order, the status of all associated requests will automatically be updated to match (941 On Hold). However, if other work orders with different statuses are also associated with the request, the request status will not change.
948 = Missing Required Data
If you try to save a work order and set the status as "complete" and the work order is missing required data related to a preventative maintenance item, the number code 948 Missing Required Data will automatically be populated in the Status field and you will be prompted to enter the missing data. Once you have filled in the missing data, you will be able to manually change the work order status to "completed."
Note: The system does not automatically update the status to "complete" once you populate the missing data. You must change the status manually.
951 = WO Canceled
>952 = Closed/Complete
If you have the 'Auto Update Req Status when WO complete' option (in Work Options) turned on, then whenever you close or cancel a work order, any associated requests will automatically be closed as well. However, if other work orders with different statuses are also associated with the request(s), you will be prompted to close the request(s) or leave it open.
If you have the 'Auto Update Req Status when WO complete' option turned off, then whenever you close or cancel a work order, you will be prompted to close the associated request(s) or leave it open.
990 = Closed by Affected PM
This code is for users to keep track of work orders that are closed because the set work was covered by another work order generated by a PM.
For example a PM generates to inspect a fire hydrant. Around the same time a request is received and turned into a work order because the hydrant is leaking. The crew goes out to inspect and repair the hydrant and this is tracked on the PM generated work order. The request generated Work Order is linked to the other work order and closed with an code of 990.
Important: Work order numbers are automatically generated based on your computer's system clock. Each number begins with the year the work order was entered; therefore, you'll want to be sure that all work orders for the current year are entered prior to year-end. Otherwise, those work order numbers will begin with the new year. It is not mandatory that you enter work orders in the year they were requisitioned; however, resetting the system clock to the previous year will have serious negative consequences for the Work system. Do not manually change your system clock.
Field Name
Definition
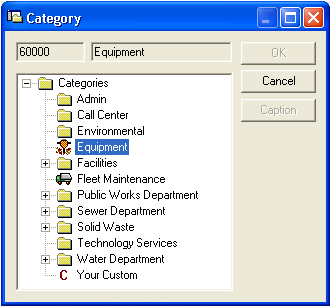
Category
This field allows you to select a category from the Categories module. Click the Category button or press F9 to access the pick list seen below:
Problem
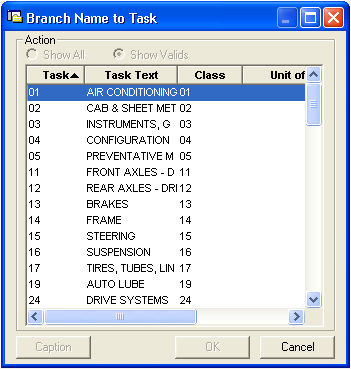
Main Task
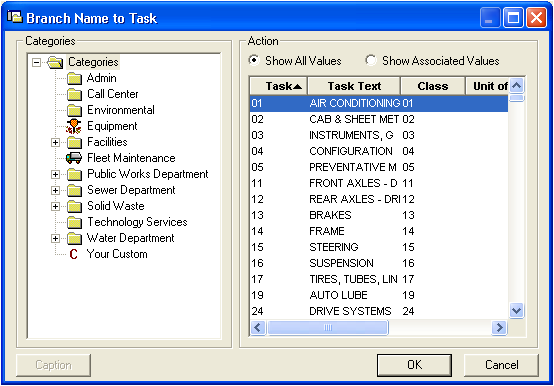
These fields allow you to select a problem and main task associated with your category. Click on the Main Task or Problem button or press F9 in those fields to access the pick lists. If you have previously selected a category, the Main Task and Problem pick lists will be limited to those items associated with that category.
Warning: Administrators should NOT set the Category field to Required. By default, this field is already required by the system. When you manually set the field to Required, the system will disallow users from saving records.
Alternatively, if you have not yet selected a category, the following window will appear:
Important: The Main Task is a required field. You must enter a main task in order to save your changes to the record.
Note: We now have a special F7 popup for Problem, Cause, Task, Employee, Supervisor, and Assigned By. This allows the user to type in the start of a code and then popup a listing of values that start with what was typed (i.e., enter E in the Task code, hit F7, and the popup list provides only values starting with an E that are also associated with the category).