To swap one container for another at a solid waste account location, complete the following steps:
Right-click on a container listing and select Swap Containers at Location. The following dialog will appear:
The Container Number, Container Type, and Purpose fields will be populated by the system and will not be editable.
Enter the date the container was Removed in order to save the record.
Enter any additional dates and notes as needed.
Save and Close the record.
Note: Once you save the record, the container listing will be removed from the grid and the following dialog will appear. Additionally, a history record will be added to the associated Containers record.
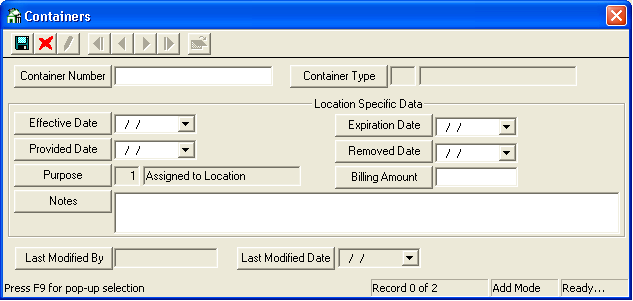
Press F9 or click on the Container Number button to select an existing Container from the pick list. Only containers not currently associated with a solid waste account location will appear in the pick list. This field is required in order to save the record.
The Container Type will be automatically populated by the system with data from the corresponding Containers record.
Enter the Effective Date. This field is required in order to save the record.
Enter the Provided Date, Expiration Date, and Removed Date as needed.
The Purpose field will be automatically populated by the system.
Enter the billing amount in the field provided. The total billing amount for all containers associated with the account will appear in the Attributes tab.
Enter additional notes as needed.
Save and close the record. Like before, a history record will be added to the associated record in the Containers module.