The work order tool allows users to generate one or more work orders. The tool can either create work orders based on the filterset, or on the records selected in the grid. It can also create a single work order for all the records, or individual work orders for each record. Finally the work order can be based on a template from the PM/Template module.
How To Create Work Orders
Create a filter for the records that need a work order OR select all the records in the grid that need a work order.
Click the button. The following pop-up will appear:
Note: The Where section of this pop-up will only appear if there is more than one record selected.
Note: This pop-up will not appear at all if there is only 1 record in the filterset.
Under Create Work Order(s) for... select whether the work order is going to be created for the Selected RecordsOR the FIltered Records.
Under Where (if it appears) select whether the tool is going to create 1 Work Order with all of the records attached OR 1 work order for each record.
Under Select Template is a list of templates from the PM/Templates module. This will only show templates that have a category that matches the type of asset the work order is for.
Click OK.
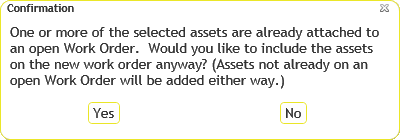
If any of the assets are already on a open work order the following pop-up will appear asking if the user wants to create another work order.
Note: This only appears if the Notify user when Asset is already attached to an open Work Order work option is set.
Click Yes to continue.
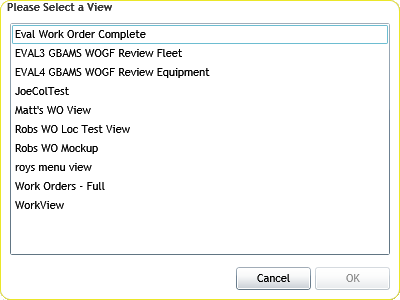
The system will now open the work order in a view. If there is more than one view available for the work order module the following pop-up will appear:
Select a view from the list and click OK. The view will open and display the new work order.
If no view exists, the work order will still be created and a message a notation will appear above the grid indicating that the operation succeeded.