How To Add a Project Asset Record

  1. To create a new record, highlight a listing in the Project Asset Distribution grid.
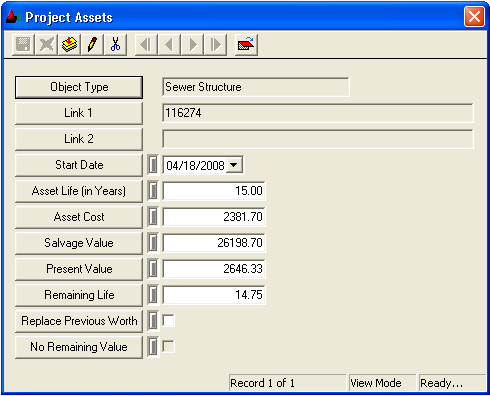
  2. Right-click in the Project Asset grid. Select Add Record. A window similar to the following will appear:

    project single asset

  3. The Object Type is entered automatically by the system. This matches the highlighted Object Type in the Project Asset Distribution grid.

    Note: The Object Type field cannot be edited by the user. To change the Object Type, highlight a different Asset Type listing in the Project Asset Distribution grid.

  4. Select an individual asset from the Link 1 pick list (use F9 to access the list). The list displays assets of the same type as indicated in the Object Type field.
  5. The Link 2 field will be populated by the system if the asset chosen from the Link 1 list has an alternate or secondary ID. For example, Sewer Pipes have two system IDs.
  6. If you selected Count as the UOM (unit of measure) in the related Project Asset Distribution record, the system populates all other fields in this dialog with data from that record. This data can be edited as needed.
  7. If you selected Sum as the UOM (unit of measure) in the related Project Asset Distribution record, only the Asset Life field is populated. All other data is user-entered.
  8. The system calculates the Present Value and Remaining Life fields. The calculation for the Remaining Life field is as follows:
  9. If the asset has reached the end of its useful life, the system marks the No Remaining Value checkbox.
  10. Save and close the record.

In This Section

Add Multiple Records

Viewing, Editing, and Deleting Records

Create a Subset

Loading a Subset

View Asset Inventory Record

View Asset in Map

Stretch

See Also

Asset Distribution

How To Add a Project Asset Distribution Record