
 Print
Print
|
|
|
|
|
Build a Filter
To access the Build-A-Filter tab, click add on the main filter dialog. You can then create a new custom filter in the window provided.
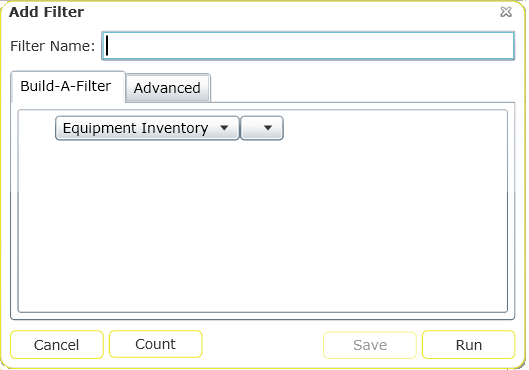
- Use the initial drop-down list to select the parent or child module on which you are filtering. Note that Work Order Resources are broken down by resource type. You can only filter on a single work order resource type in each individual filter.
- After selecting a module from the first list, a second drop-down list will appear. This list contains all of the fields on which your records can be filtered from the selected module.
- Use the next drop-down list to select the filter modifiers (Starts With, Ends With, Equal, etc.).
- In the blank field that appears, enter the specific field content for which you are filtering. For code-type fields, a drop-down list is provided allowing you to select from codes currently in use.
- If you'd like to add an additional field to the filter, click the Add button
 . You'll then repeat the above process with additional drop-down lists, allowing you to select a new field and define filter criteria. Each added field creates an "And" statement and serves to further limit the filterset.
 - If you add the same field multiple times to the filter, it creates an "Or" statement. For example, you can include the following in your filter: Problem Contains "xyz", Problem Contains "abc". The resulting filterset will include all Problems that contain either "xyz" or "abc". However, you should not use a filter statement like the following: Problem Does Not Contain "xyz", Problem Does Not Contain "abc". The resulting filterset will contain all possible problems (all Problems that do not have "xyz" or all Problems that do not have "abc").
- You can click the Delete Entry button
 to remove a field from the filter.
 - If you'd like to save the filter, enter a unique filter name and click the Save Filter button. This filter will then be available for use at a later time.
- Once you've finished defining your filter criteria, click Run Filter. The filtered dataset will appear.
- Any filter that was created using this Build-A-Filter dialog will be designated as a "Web Filter" on the initial Filter window. These filters will only be available for use on the web; they will not be added to the filters within the Lucity Desktop application.
Note: You can use the Build-A-Filter on memo (Comment) fields in the Lucity Web application, as well as create Date Related %% and %Fiscal Year% filters. These options are not currently available in the Lucity desktop application.
See Also |
Print
| © Lucity, Inc. All rights reserved. |
|