Legacy Layer Conversion
The Legacy Layer Conversion section enables users to migrate GIS content to EAM Web. This GIS data was previously configured using GIS Configuration in the Administration Tool or the Geodatabase Configuration in ArcCatalog. Layers that were configured using these legacy tools will still work; however, users on EAM Web version 21.1 or later who previously used the GIS Configuration in the Administration Tool and want to edit layer configuration must convert layers to EAM Web Admin Portal's GIS Configuration.
Warning: Once converted, layer records and all related items (Aliases, Fields, Spatial Relationships, Number Generators, Scheduled Tasks, and Services) will be deleted from and no longer work with the Lucity GIS tools in ArcMap and ArcCatalog. This conversion procession will completely migrate layers and related items to GIS Configuration in EAM Web's Admin Portal.
Note: Converted layers will continue to work with the tools available with Lucity add-ins for ArcGIS Pro, Lucity/EAM Web Map, and Mobile maps (2x and 3x).
|
Buttons |
Description |
| Tell me more |
Provides additional details about the Legacy Layer Conversion tool. Important: Users should read all information about this tool prior to proceeding with conversion. |
|
|
Converts the selected legacy layer to EAM Web. |
|
|
Refreshes the current grid. |
Legacy Layer Conversion grid
The Legacy Layer Conversion grid displays basic information about the GIS layer, as well as its linking fields and certain diagnostic fields.
| Layer configuration | Description |
|---|---|
| AutoID | Identifies the number used to link EAM records with the layer. |
| Legacy Layer Name | Indicates the name of the legacy layer. |
|
Module ID Module Name |
Identifies the number and name of the module related to the layer. |
| Disabled |
Identifies a feature class layer that is not in use but needs to remain in the setup. |
| Alias Count | Indicates the number of aliases the selected layer has. |
|
Default Value Count Field Count Number Generator Count Spatial Relate Count Scheduled Task Count |
Summarizes the number of mappings for the given layer configuration. |
|
Workspace ID Workspace Name Workspace Type Workspace URL |
Identifies the service currently used to push edits. |
|
Service ID Service Name Service URL |
Identifies the service currently used to push edits, if different from the workspace. |
Conversion
Backing up database
The conversion will delete records from the following tables: CMARCGDB, CMARCALI, CMARCLNK, CMGISFLD, CMGISSREL, CMGISNXTN, CMGISTASKS.
Backup any necessary data from these tables before beginning layer conversion.
Planning conversion
Special consideration should be given to the order in which layers are converted. Layers being used in a spatial relationship or number generator should be converted before the layer that is referencing them. In the event a related layer is not converted first, the conversion will still succeed, but you will likely need to manually edit the related layer information for the spatial relationship and/or number generator after the conversion has completed.
Example: The Park Court layer has a spatial relationship configured that references another layer, Park. In this example, you would want to convert the Park layer before the Park Court layer.
Warning: Do not convert layers that you need to use with the Lucity GIS tools in ArcMap and ArcCatalog. These layers will not work there once converted.
Converting layer(s)
 You should run the conversion as a Lucity/EAM user that been assigned to the Admin user group. At a minimum the user needs to have Run, Add, Edit and Delete permissions to all the GIS Setup modules and the Run permission for GIS System Configuration.
The conversion can be ran on a single layer or multiple.
Warning: We recommend that you test the conversion process on a single record before running it on multiple.
- Open
 .
. - In the menu on the left select GIS Configuration > Legacy Layer Conversion.
-
Select Convert at the bottom. A pop-up appears asking you to confirm converting the selected record.
Tip: Since this tool converts the selected layer and all related information, consider the relationship between your layers and the order in which you should convert them.
Warning: This conversion process cannot be undone.
-
Select OK. A pop-up similar to the following opens:
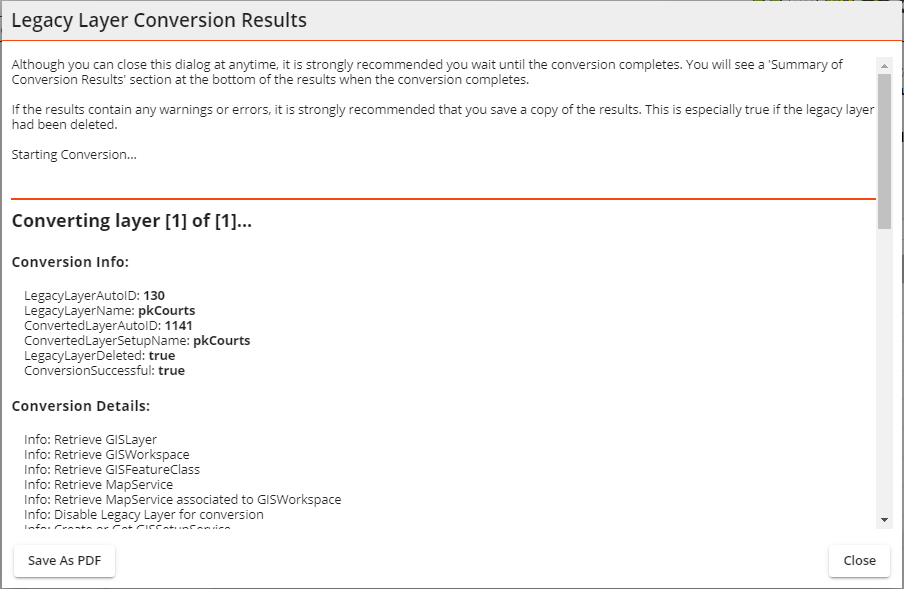
- Use the scroll bar on the right to view the legacy layer conversion results:
- The Conversion Info
- The Conversion Details will display an errors such as the following:
Warning: Related layer has not been converted or unable to determine if it has. The conversion will treat the related layer as not being linked to Lucity. This may require you to modify the related layer info after the conversion is complete.
The Summary of Conversion Results displays information similar to the following:
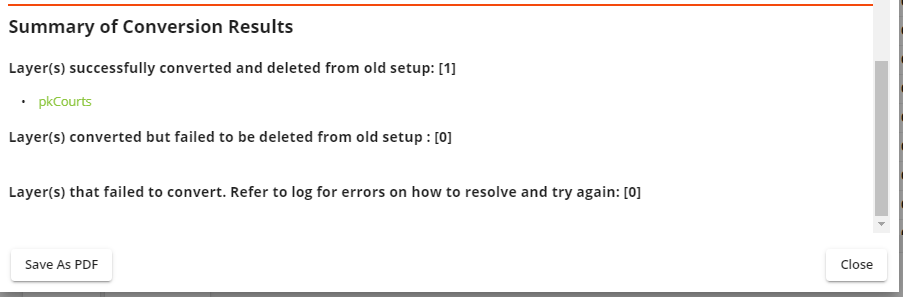
- Select Save As PDF if desired. The Legacy Layer Conversion Results will download to your machine in PDF format.
- Select Close. The Conversion Results window closes and the Legacy Layer Conversion grid refreshes.
-
Continue with actions to address any conversion issues identified in step 5c as needed.
Continue with additional conversions as needed.
After you convert a legacy GIS layer, complete the following steps to validate and confirm your layer conversion.
- Open .
- In the menu on the left select GIS Configuration > Layers. The layer you converted should be listed in the grid.
- Select your converted layer.
- Select the Validation
 button at the top right. The Validation Results pop-up opens and displays the validation process and results.
 - Review the validation results. If you want to save these results, select Save As PDF and save to your desired location.
- When you are finished reviewing validation results, select Close. The pop-up closes and returns you to the Layers grid.
- Repeat steps 3-5 for additional layers you want to validate.